AI Transcription Tool Guide
Step-by-step instructions for getting your coaching session transcripts from popular AI tools.
These are the tools we've evaluated and recommend. Each tool below has been tested with Coachismo to ensure smooth transcript export and compatibility with our analysis system. If you're new to transcription tools, we recommend starting with Zoom (free and built-in) or Granola (easy to use).
Always Get Client Consent First
Before recording or uploading any coaching session, you must obtain your client's explicit permission.
Sample client onboarding language:
"I use AI-powered transcription and analysis tools to support my professional development and provide feedback on my coaching. All material is automatically anonymized to remove any identifying details before analysis. The AI provides insights about our sessions and feedback on my coaching techniques - your personal information remains completely confidential. Do I have your permission to transcribe and analyze our sessions using these privacy-protected tools?"
Zoom
Built-in transcription for Zoom meetings
Fireflies.ai
AI meeting assistant with transcription
Fathom
Free AI meeting assistant with recording consent
Granola
AI note-taker with automatic transcription
Otter.ai
Real-time transcription and meeting notes
Other
Don't see your tool? Contact support@coachismo.com
Zoom
You can get transcripts using Zoom while protecting your clients' privacy.
The best method is to use cloud recording with audio-only and audio transcript enabled. This generates a transcript quickly while minimizing what Zoom stores. You'll download the transcript and then immediately delete everything from Zoom's servers.
Note: Zoom claims they do not use any audio, video, chat, screen sharing, attachments, or other communications-like Customer Content (such as poll results, whiteboard, and reactions) to train Zoom's or third-party artificial intelligence models. However, we recommend being extra cautious with client data.
We do NOT recommend Zoom AI Companion
Zoom's AI Companion may process your data in ways you don't control and could use it for AI training. The method below avoids AI Companion entirely.
Key docs:
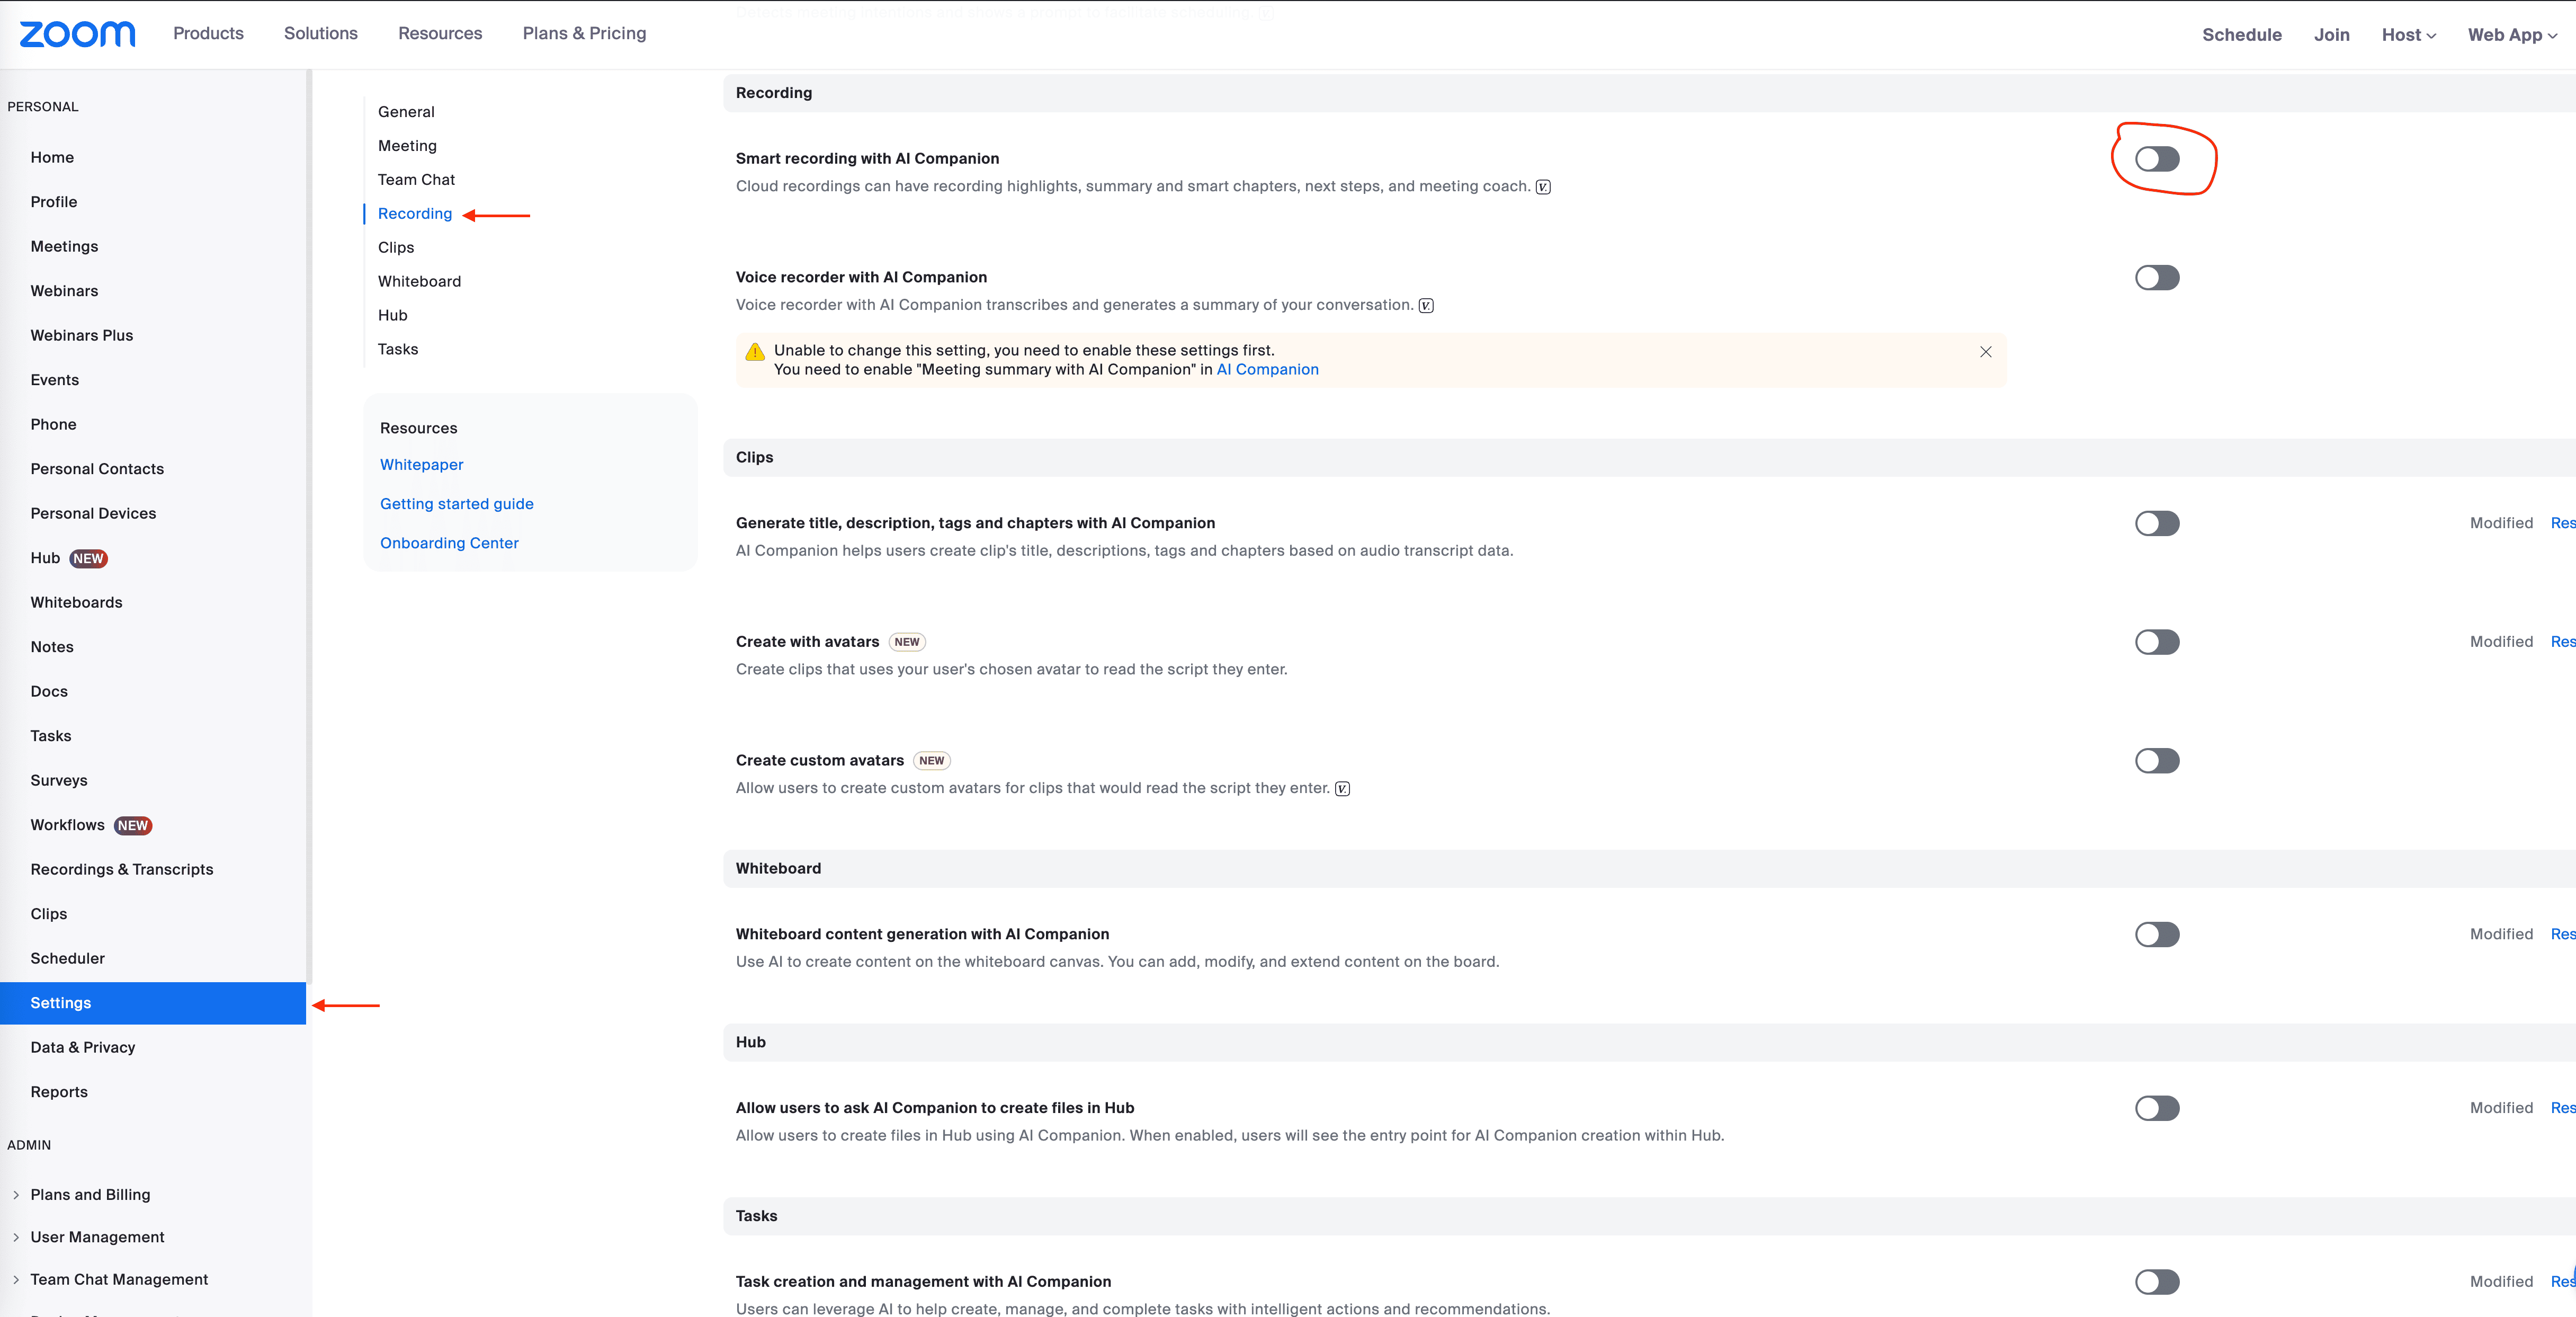
Sign in to zoom.us → Settings → Recording
Note: On the Recording settings page, you'll see settings for "Record to computer files" at the top. Those control recording to your computer and are fine to ignore (they're not a privacy issue unless you share your computer). We're configuring the Cloud Recording settings below.
In the Cloud Recording section, enable these settings:
- ✅ Cloud Recording
- ✅ Audio Transcript
- ✅ Audio only (minimizes what's stored)
In the Cloud Recording section, disable these settings:
- ❌ Automatic Recording (only record when you choose)
- ❌ Record gallery view with shared screen
- ❌ Record active speaker with shared screen
- ❌ Record thumbnails when sharing
- ❌ Save chat messages from the meeting
- ❌ Display participants' names in the recording
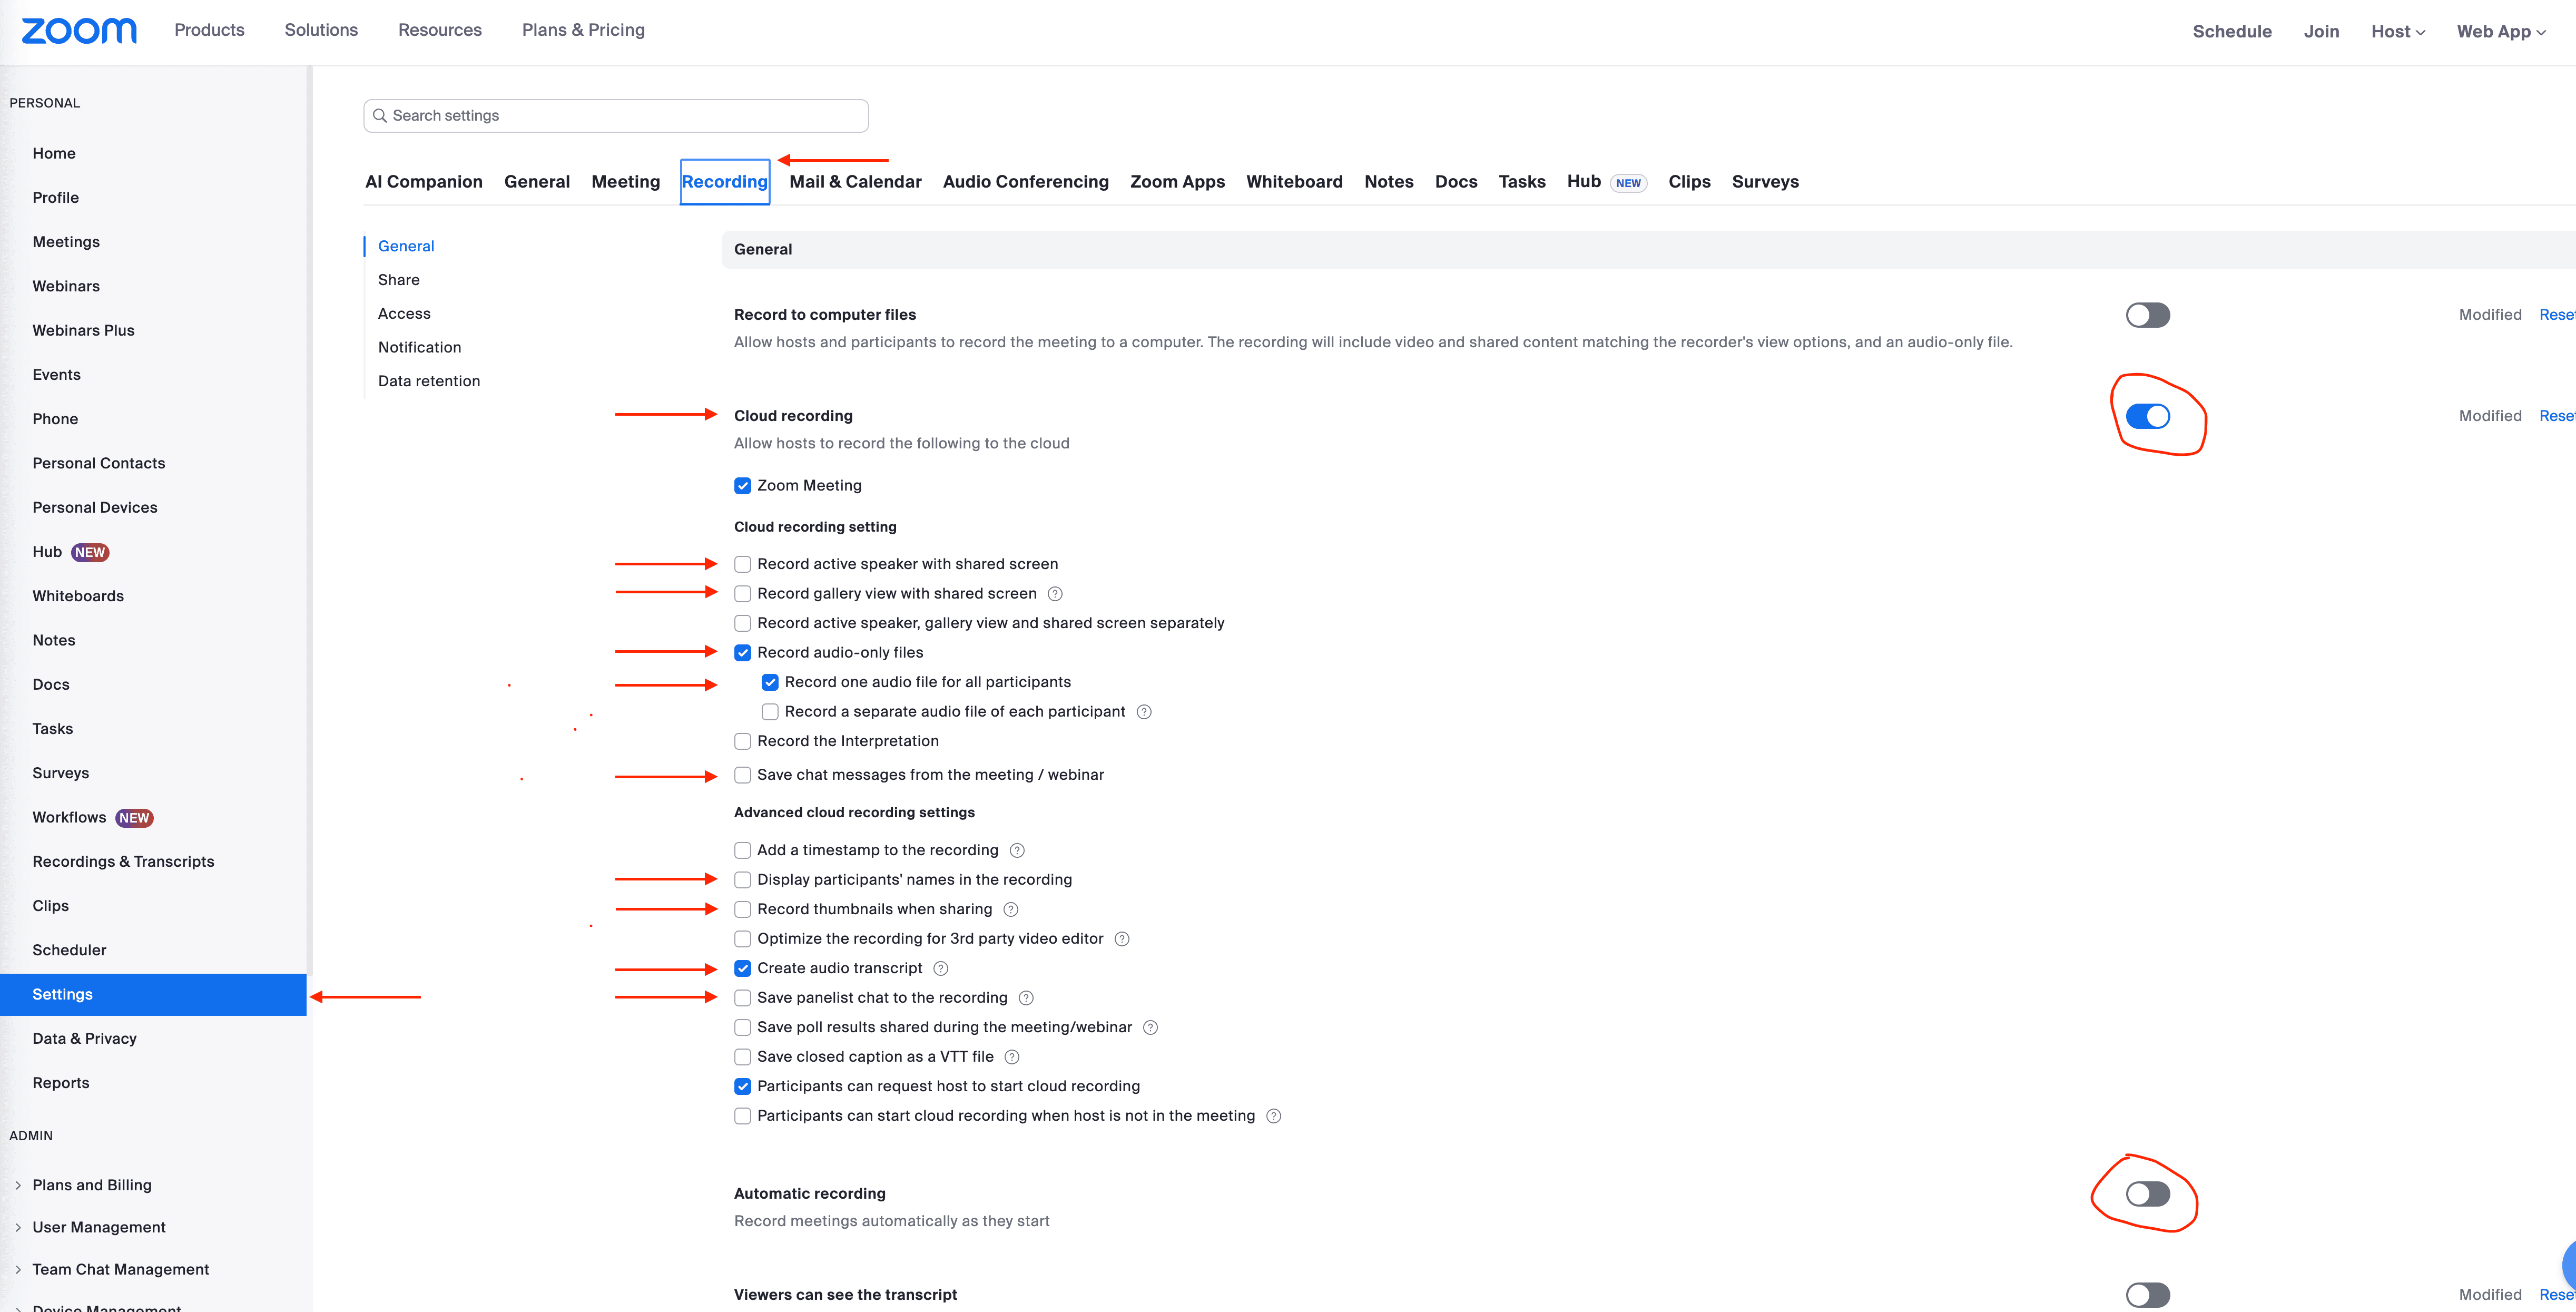
Result: Zoom will only capture audio and generate a transcript—no video, no screen sharing, no chat.
Still in Settings → Recording → Cloud Recording:
- ❌ Disable "Viewers can see the transcript" (you're the only one who needs it)
- ❌ Disable "Allow cloud recording sharing"
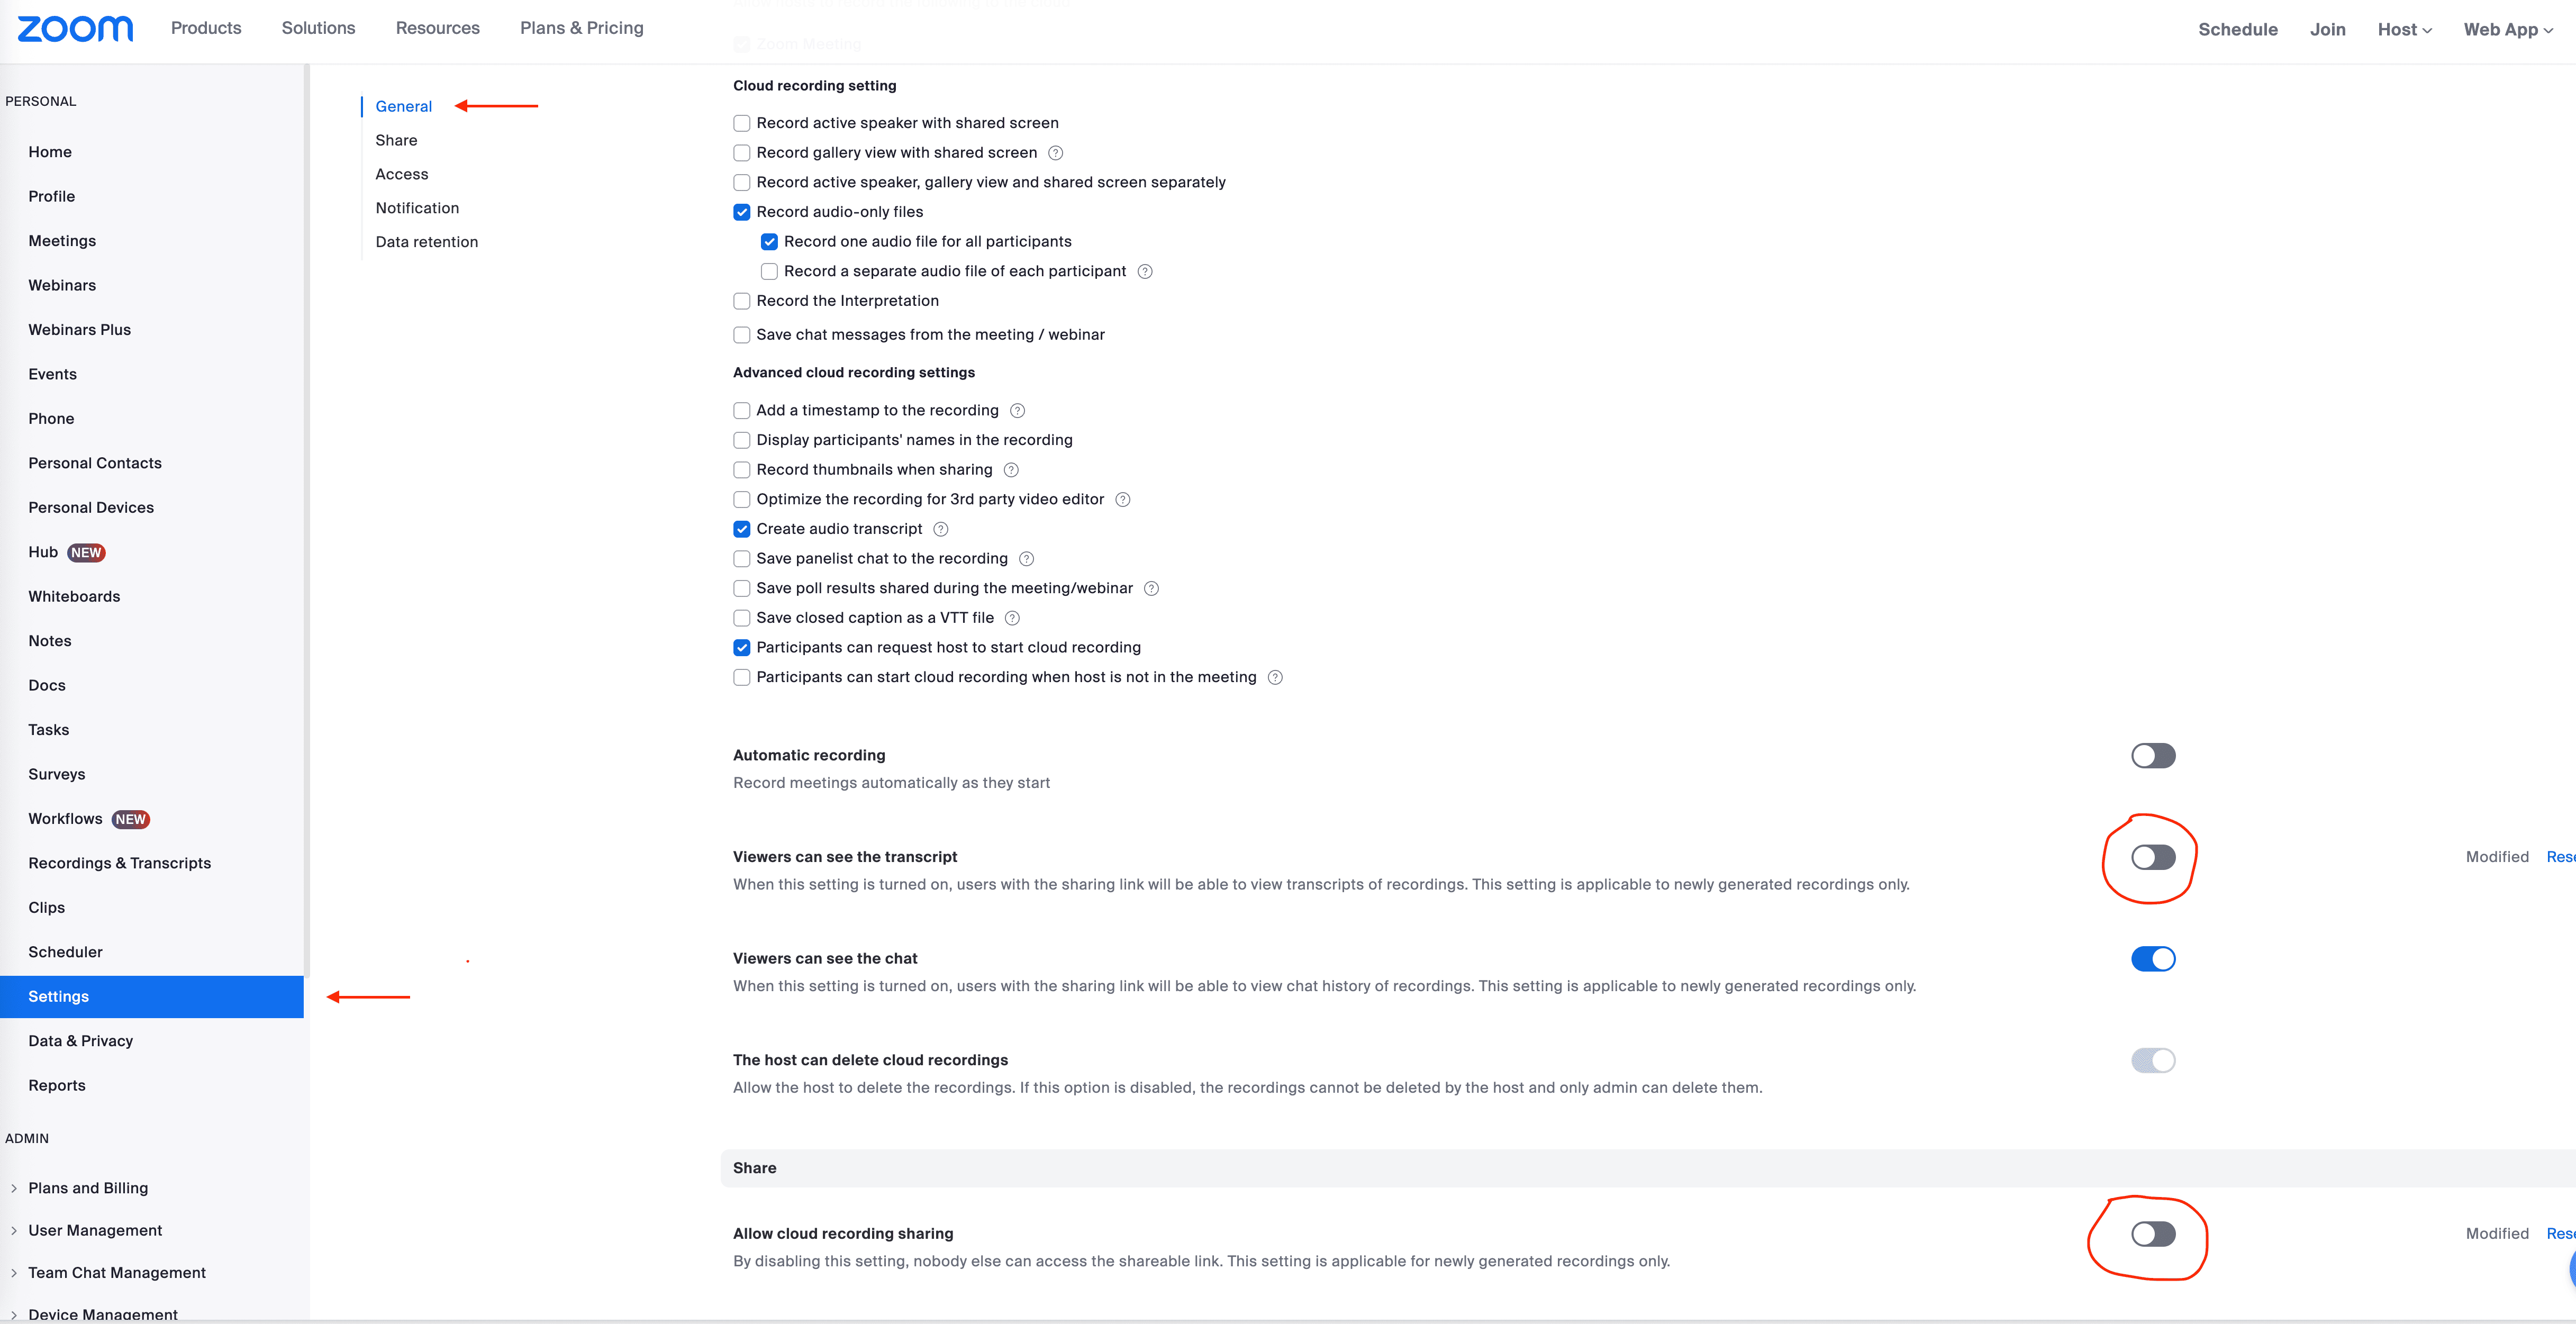
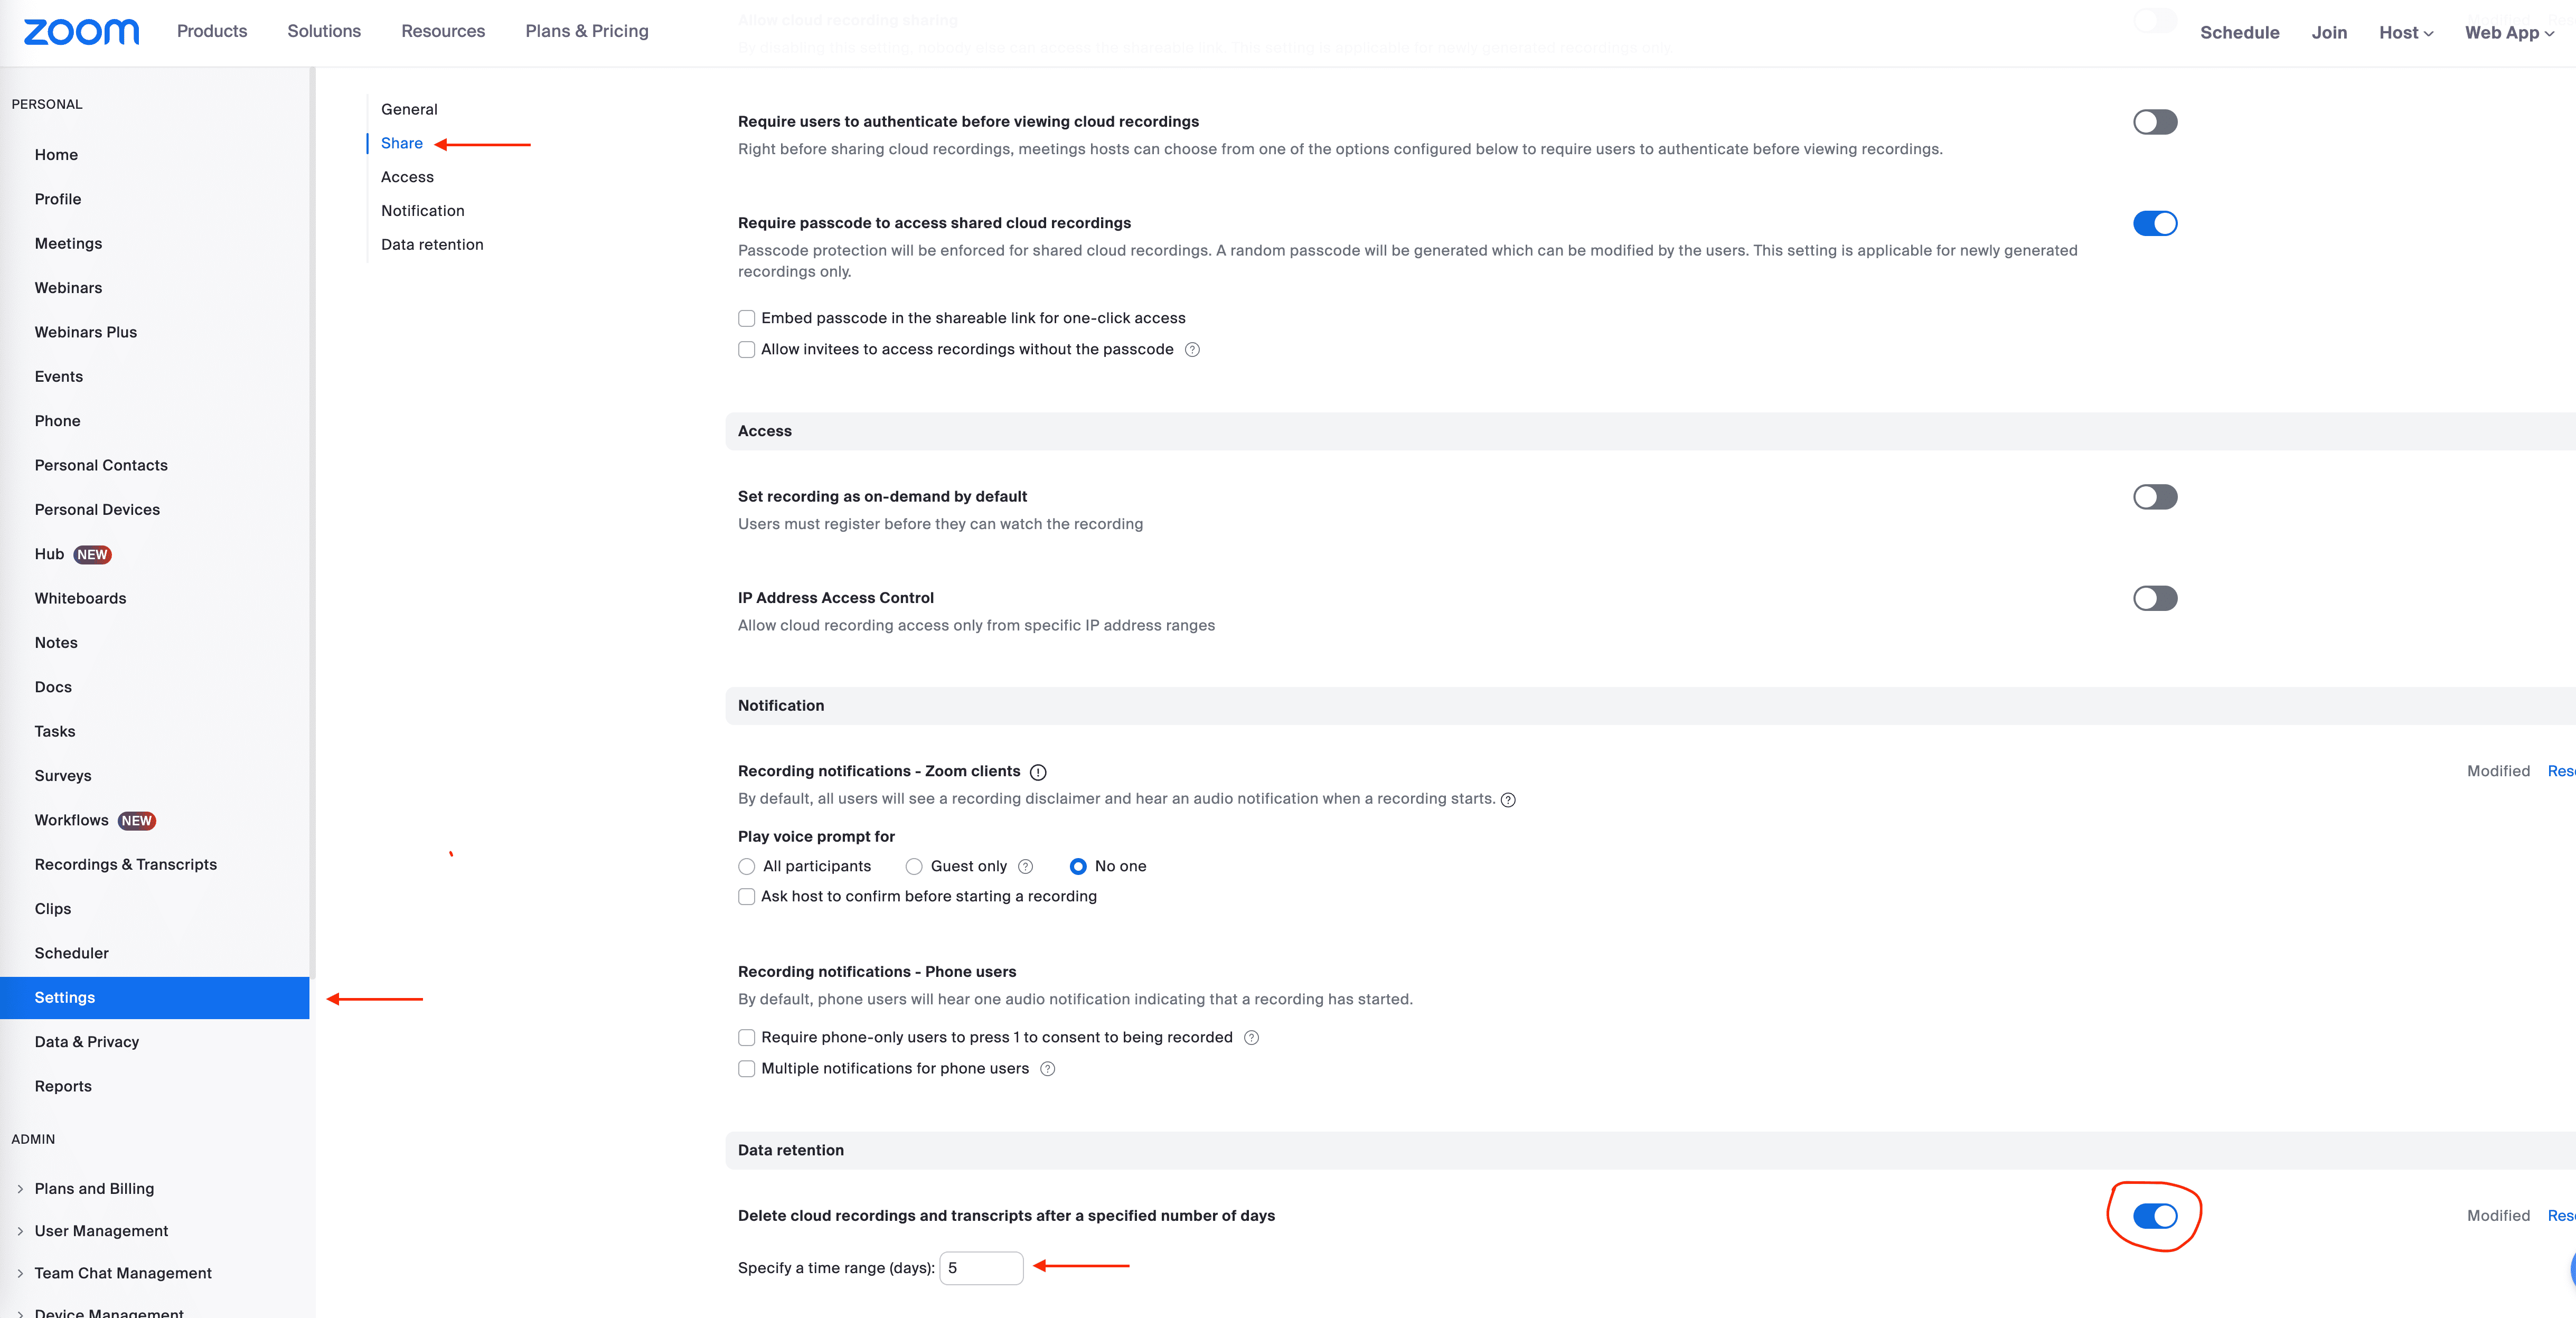
Under the Data Retention section:
- ⏳ Turn ON "Delete cloud recordings and transcripts after a specified number of days"
- ⏳ Set it to 7 days or less
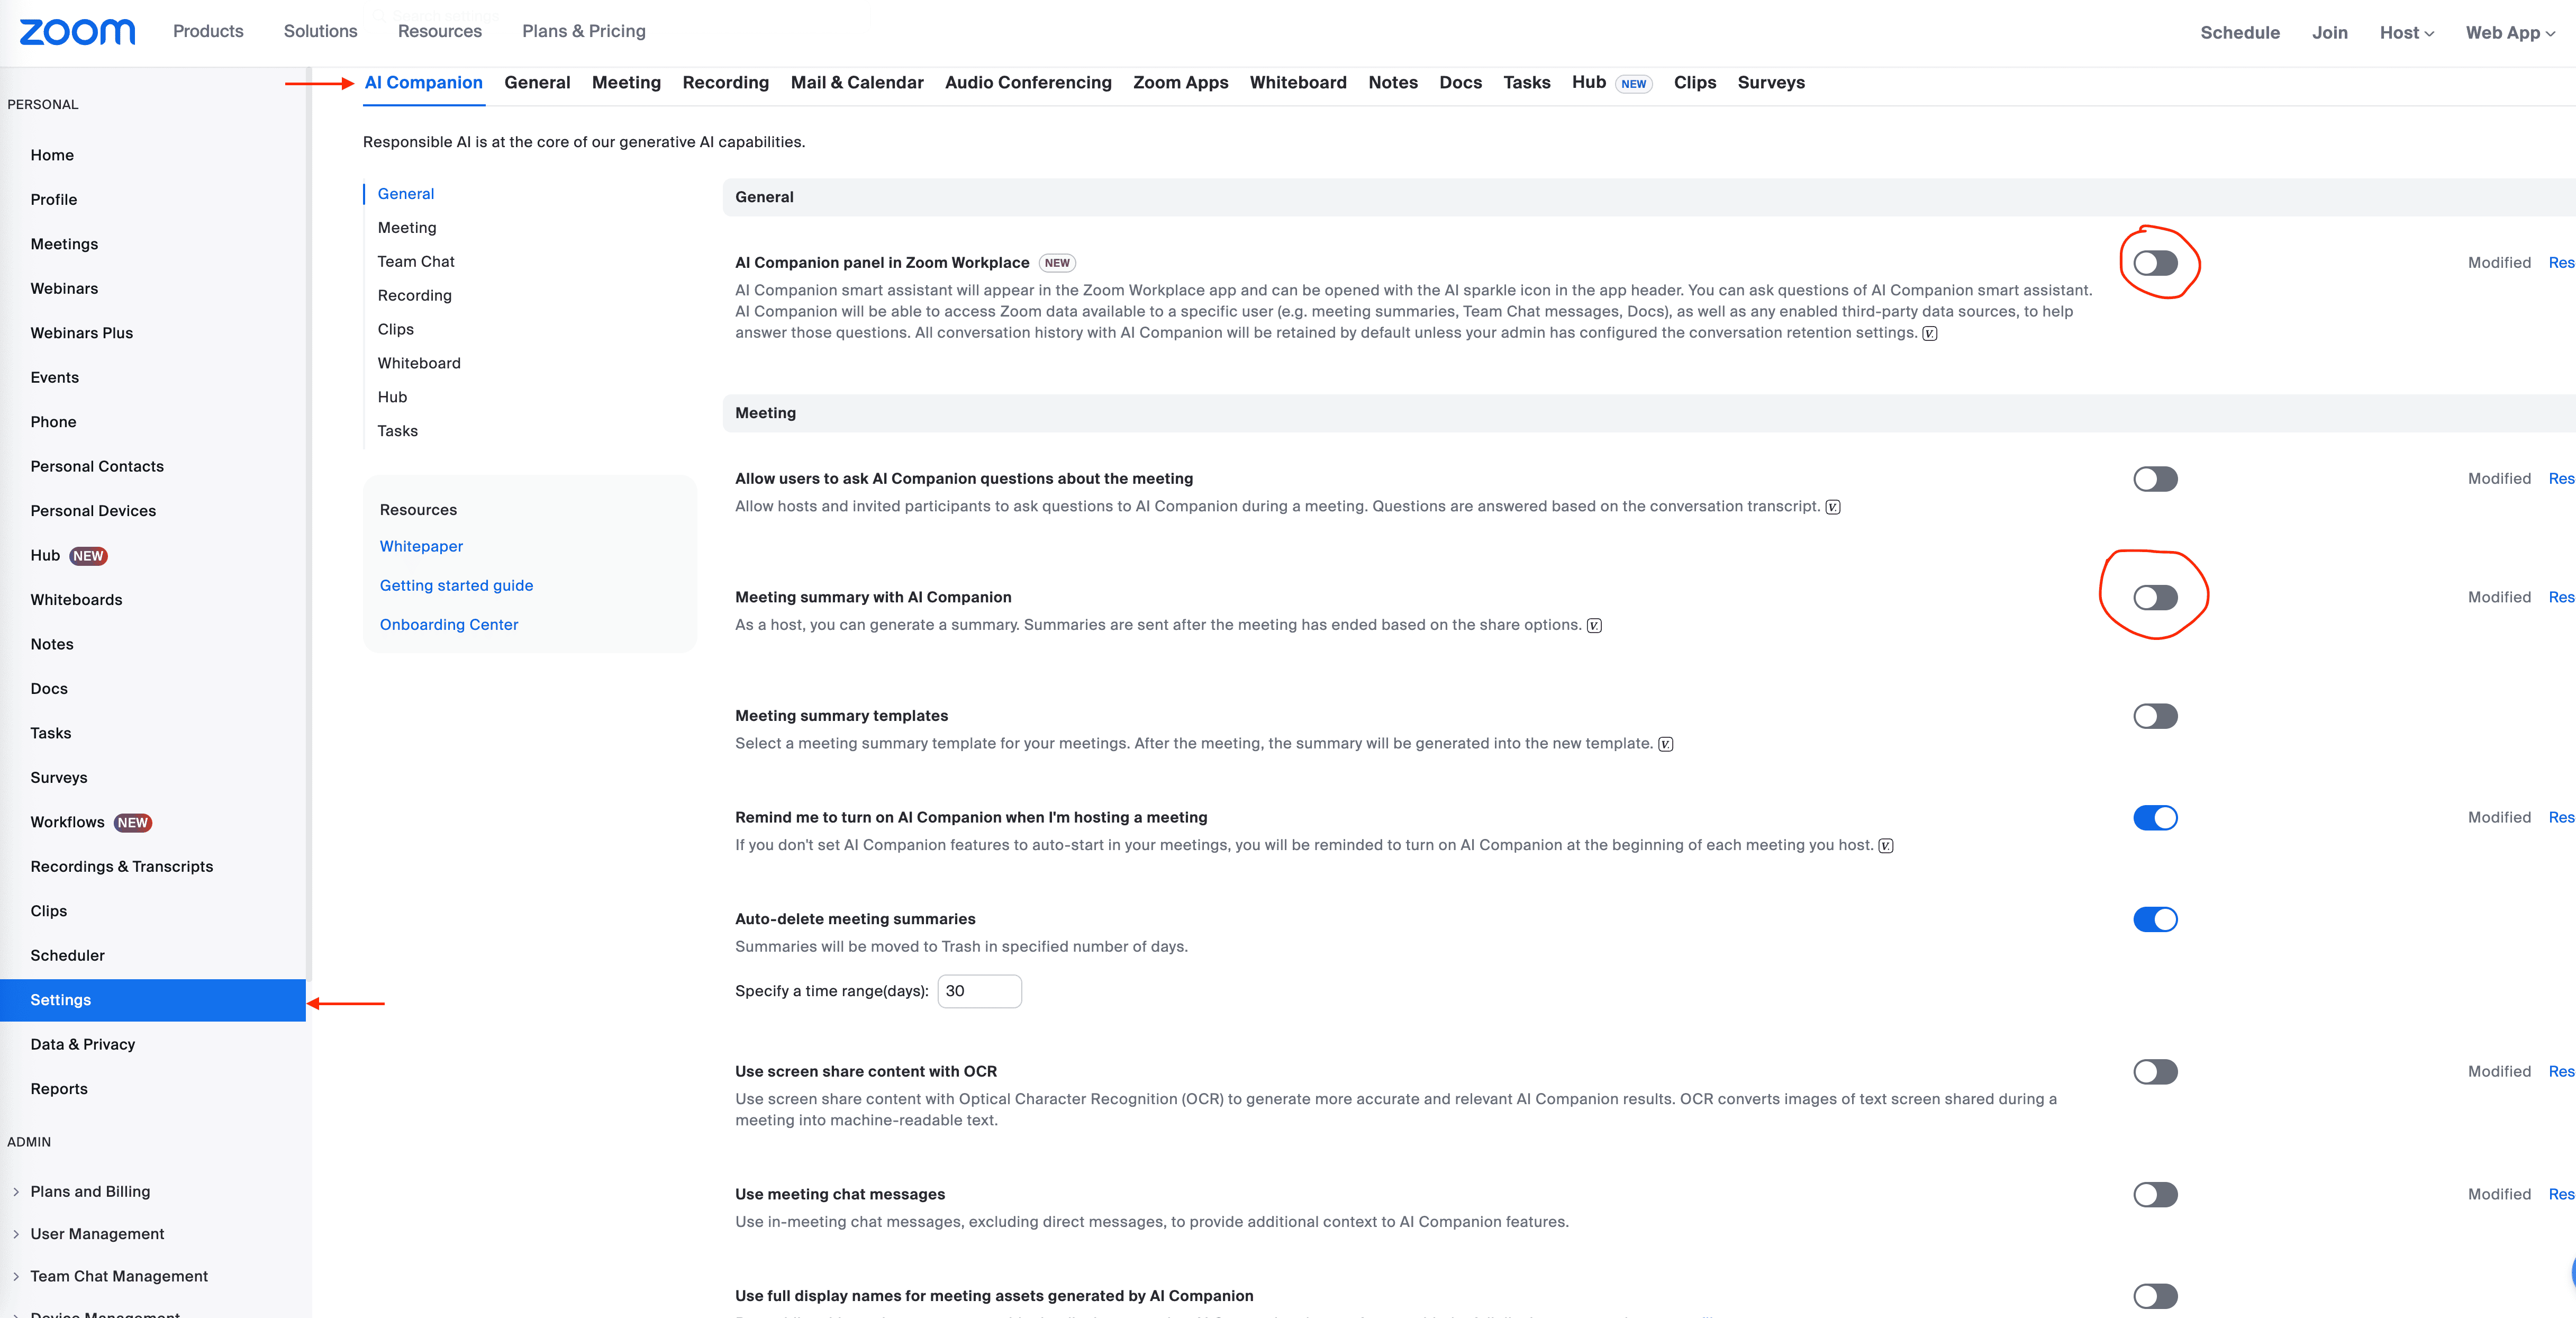
Go to Settings → AI Companion:
- ❌ Turn OFF AI Companion panel in Zoom Workplace
- ❌ Turn OFF Meeting summary with AI Companion
- ❌ Turn OFF Smart recording with AI Companion
During your coaching call:
- Click the "Record" button at the bottom of the Zoom window
- Zoom will start recording audio only (no video) to the cloud
- Click "Stop Recording" at the end of your session

Tip: Start and stop recording manually to capture only what you need. With automatic recording disabled, nothing gets captured by accident.
After the meeting ends, Zoom will process the recording (usually takes a few minutes).
- You'll receive an email when the recording and transcript are ready
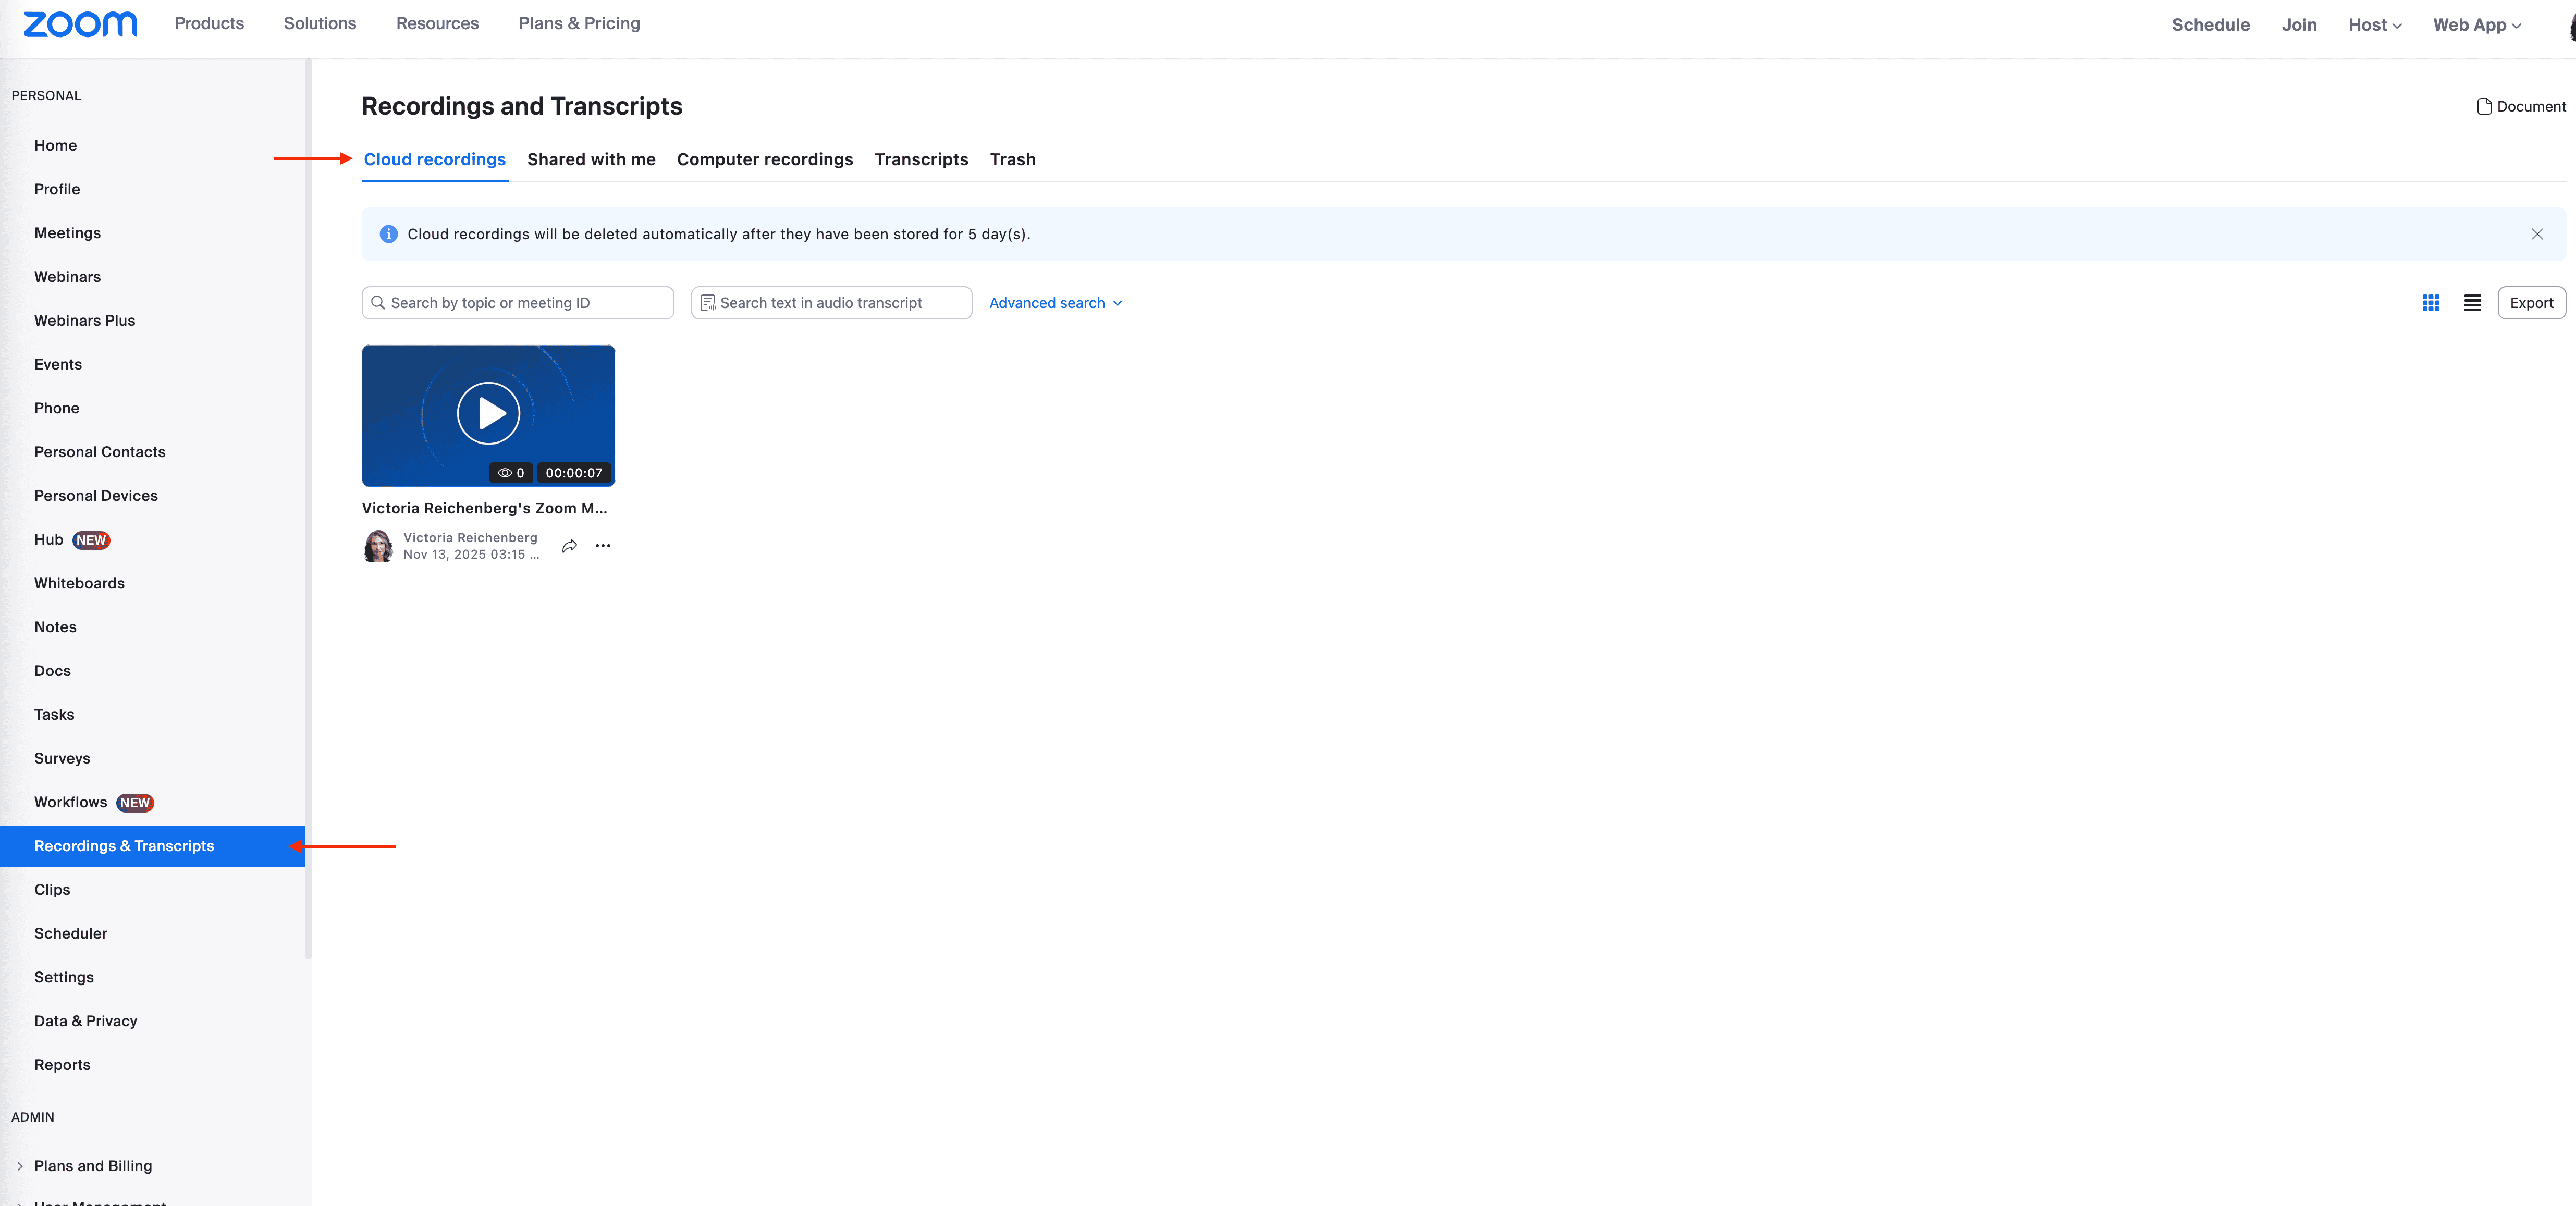
- Sign in to zoom.us
- Go to Recordings & Transcripts → Cloud Recordings
- Find your meeting and click on it
- Download the Audio transcript file (.vtt or .txt)
Privacy tip: Store the transcript on your local, encrypted drive—not in a shared folder or email.
This is the most important step for privacy!
After downloading your transcript:
- On the recording details page, click More → Delete
- Confirm deletion
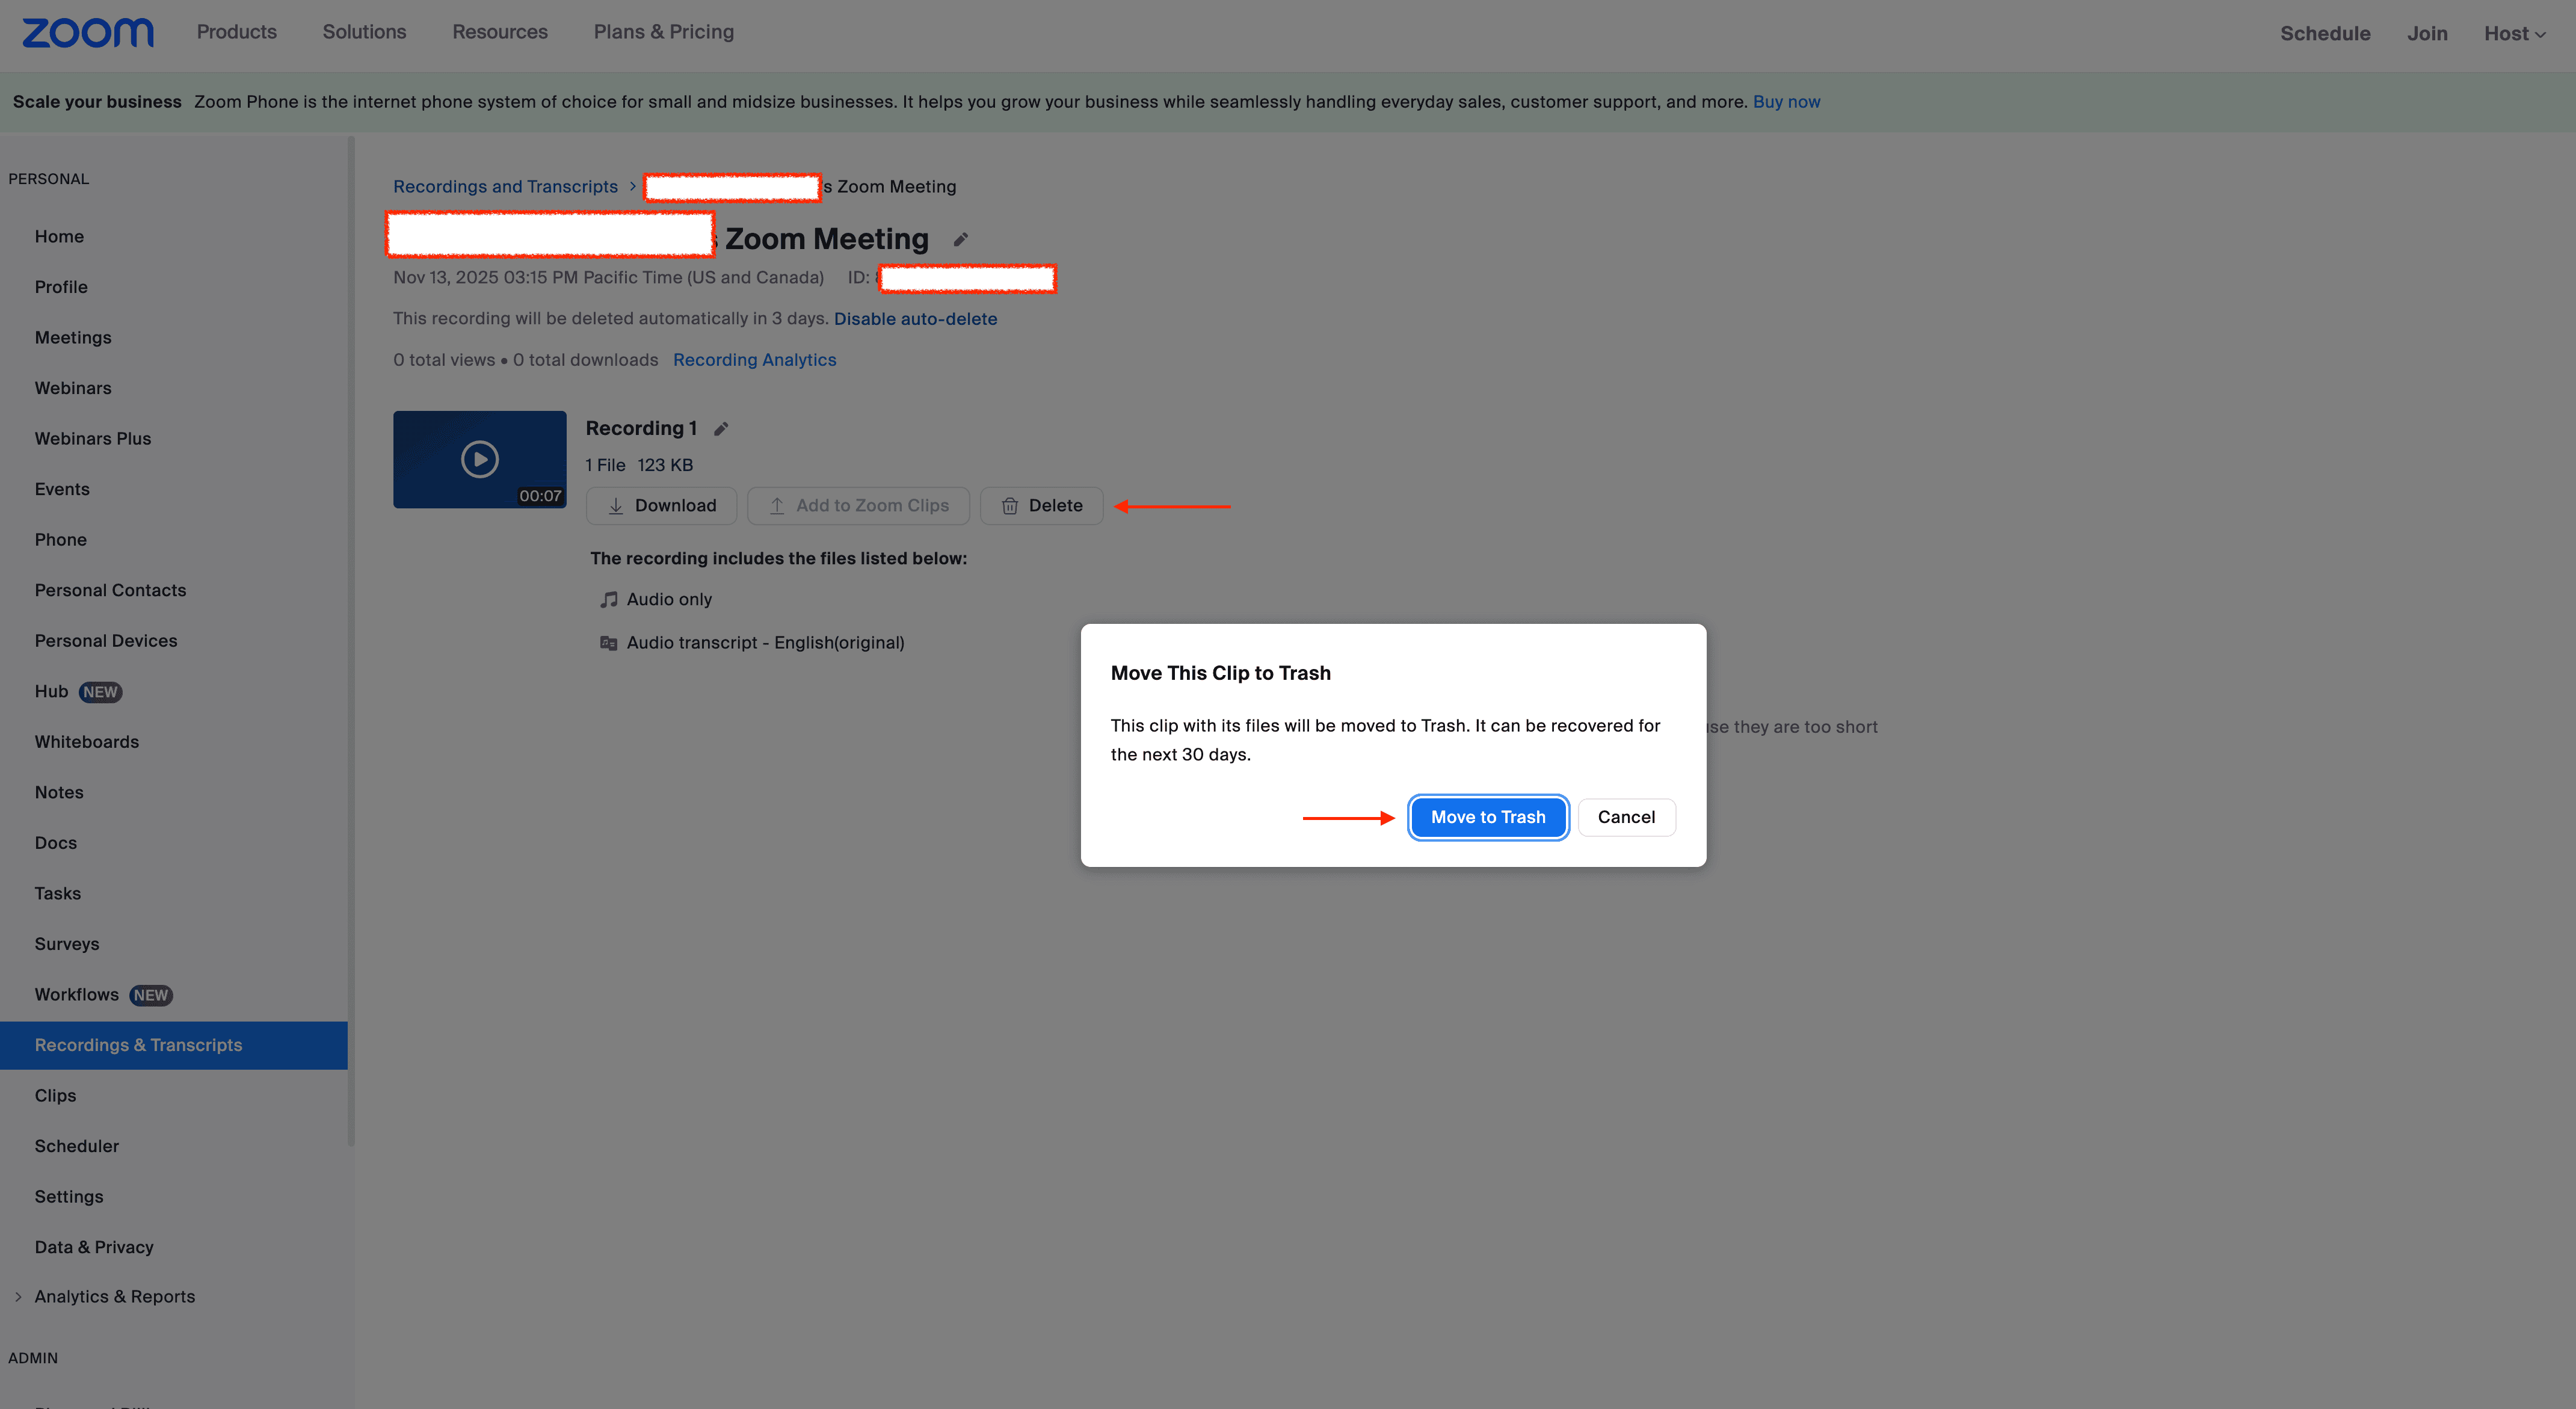
- Go back to Recordings and click Trash (upper right)
- Select the recording → click Permanently Delete
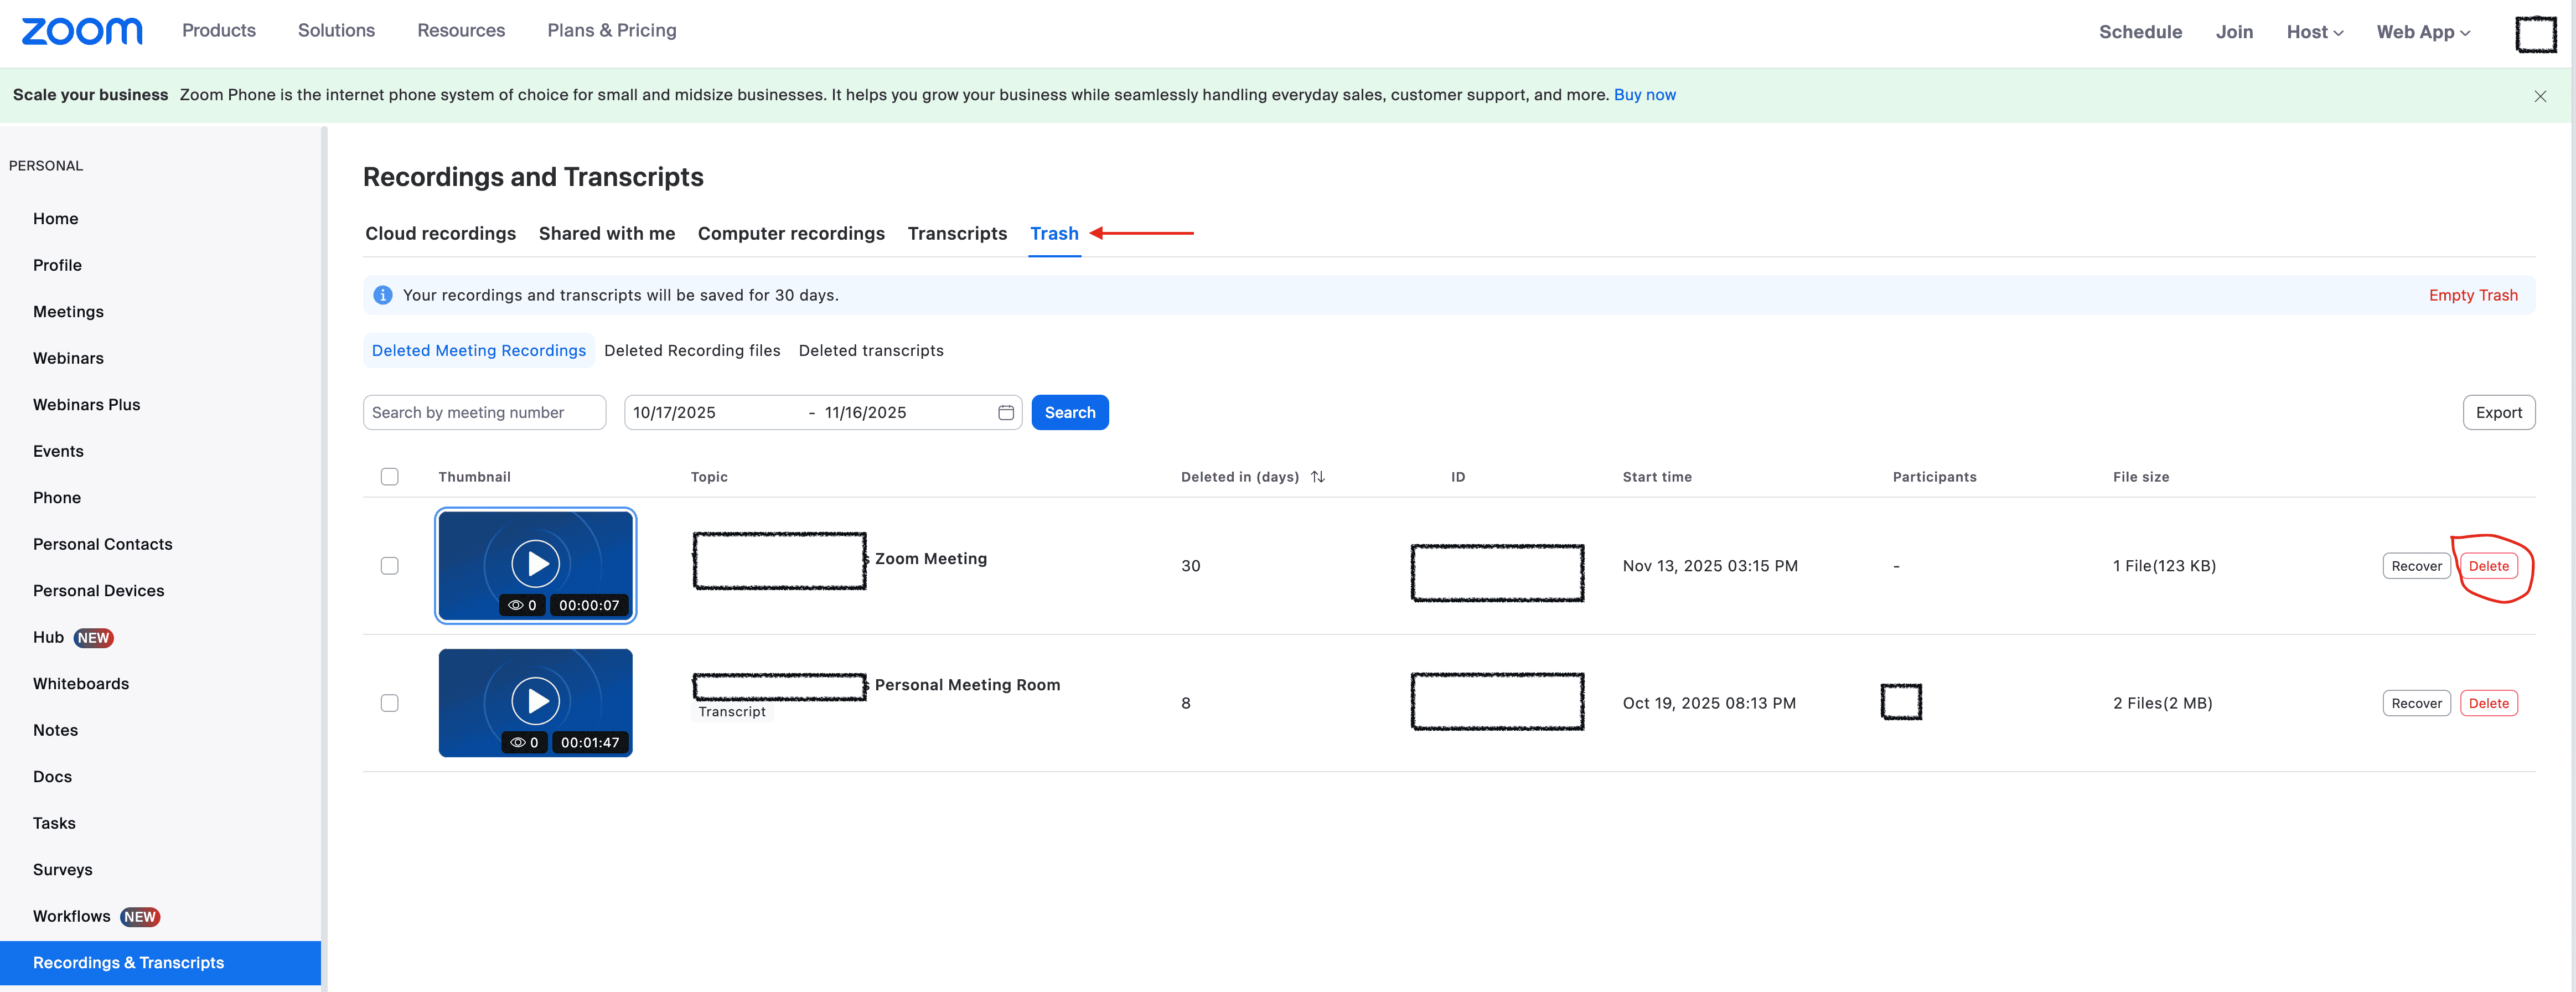
Why this matters
Zoom keeps deleted recordings in Trash for up to 30 days unless you permanently delete them. Always empty the Trash immediately to ensure your clients' data is removed from Zoom's servers.
Now that you have your transcript file and have deleted everything from Zoom:
- If you downloaded a .vtt file, you can upload it directly (Coachismo accepts .vtt)
- Or convert it to .txt if you prefer (most text editors can open and save .vtt as .txt)
- Upload the transcript to Coachismo for analysis
Supported formats: .txt, .vtt, .docx, .rtf
Follow this workflow for every session:
- Configure settings once (Steps 1-3)
- Record audio-only with transcript to cloud (Step 4)
- Wait for email that recording is ready
- Download transcript (Step 5)
- Delete recording from Zoom (Step 6)
- Empty Trash permanently (Step 6)
- Upload to Coachismo (Step 7)
Result:
- Only audio is stored temporarily (no video/screens)
- Transcript is generated quickly
- All Zoom-stored data is permanently deleted
- No AI Companion processing
- No third-party tools required
- You control the only copy of the transcript
Fireflies.ai
Fireflies.ai can auto‑join meetings, record, and generate transcripts/summaries. For individual coaches, keep it manual and minimize retention.
Privacy Policy: fireflies.ai/privacy
Go to Settings (left sidebar) → Meeting Settings
Under "Privacy Settings":
- Set "Who can view meeting recaps by default" to Only Me
- Ensure "Public Meeting Sharing" is turned OFF
Auto-join settings:
- Toggle Auto‑join calendar events OFF
- Only invite the bot when needed by adding
fred@fireflies.aito that one calendar event
- Go to My Meetings
- Click on the meeting you want to download
- At the bottom of the page, click the download icon
- In the popup, deselect "Show speaker's name" (for additional privacy)
- Select DOCX as your file type
- Download the file
After downloading, delete the meeting to minimize what resides in the Fireflies cloud:
- In My Meetings, hover over the meeting → select it → click Delete
- Or open the meeting → ⋯ → Delete
Important: Deleting meetings after export minimizes what resides in the Fireflies cloud tied to your account.
- Upload the exported .txt or .docx transcript to Coachismo for analysis.
Supported formats: .txt, .docx, .rtf
Fathom
Fathom is a free AI meeting assistant that can record, transcribe, and summarize your coaching sessions with strong privacy controls.
Fathom offers several privacy-friendly features including automatic recording consent requests, the ability to disable AI training on your data, and private-by-default sharing settings. The key is to configure these settings properly before your first coaching session.
Good news: Fathom explicitly states they do NOT share your meeting content with third-party AI providers (like OpenAI, Anthropic, or Google) for AI training. They only use anonymized data to improve their own proprietary AI models, and you can opt out of even that.
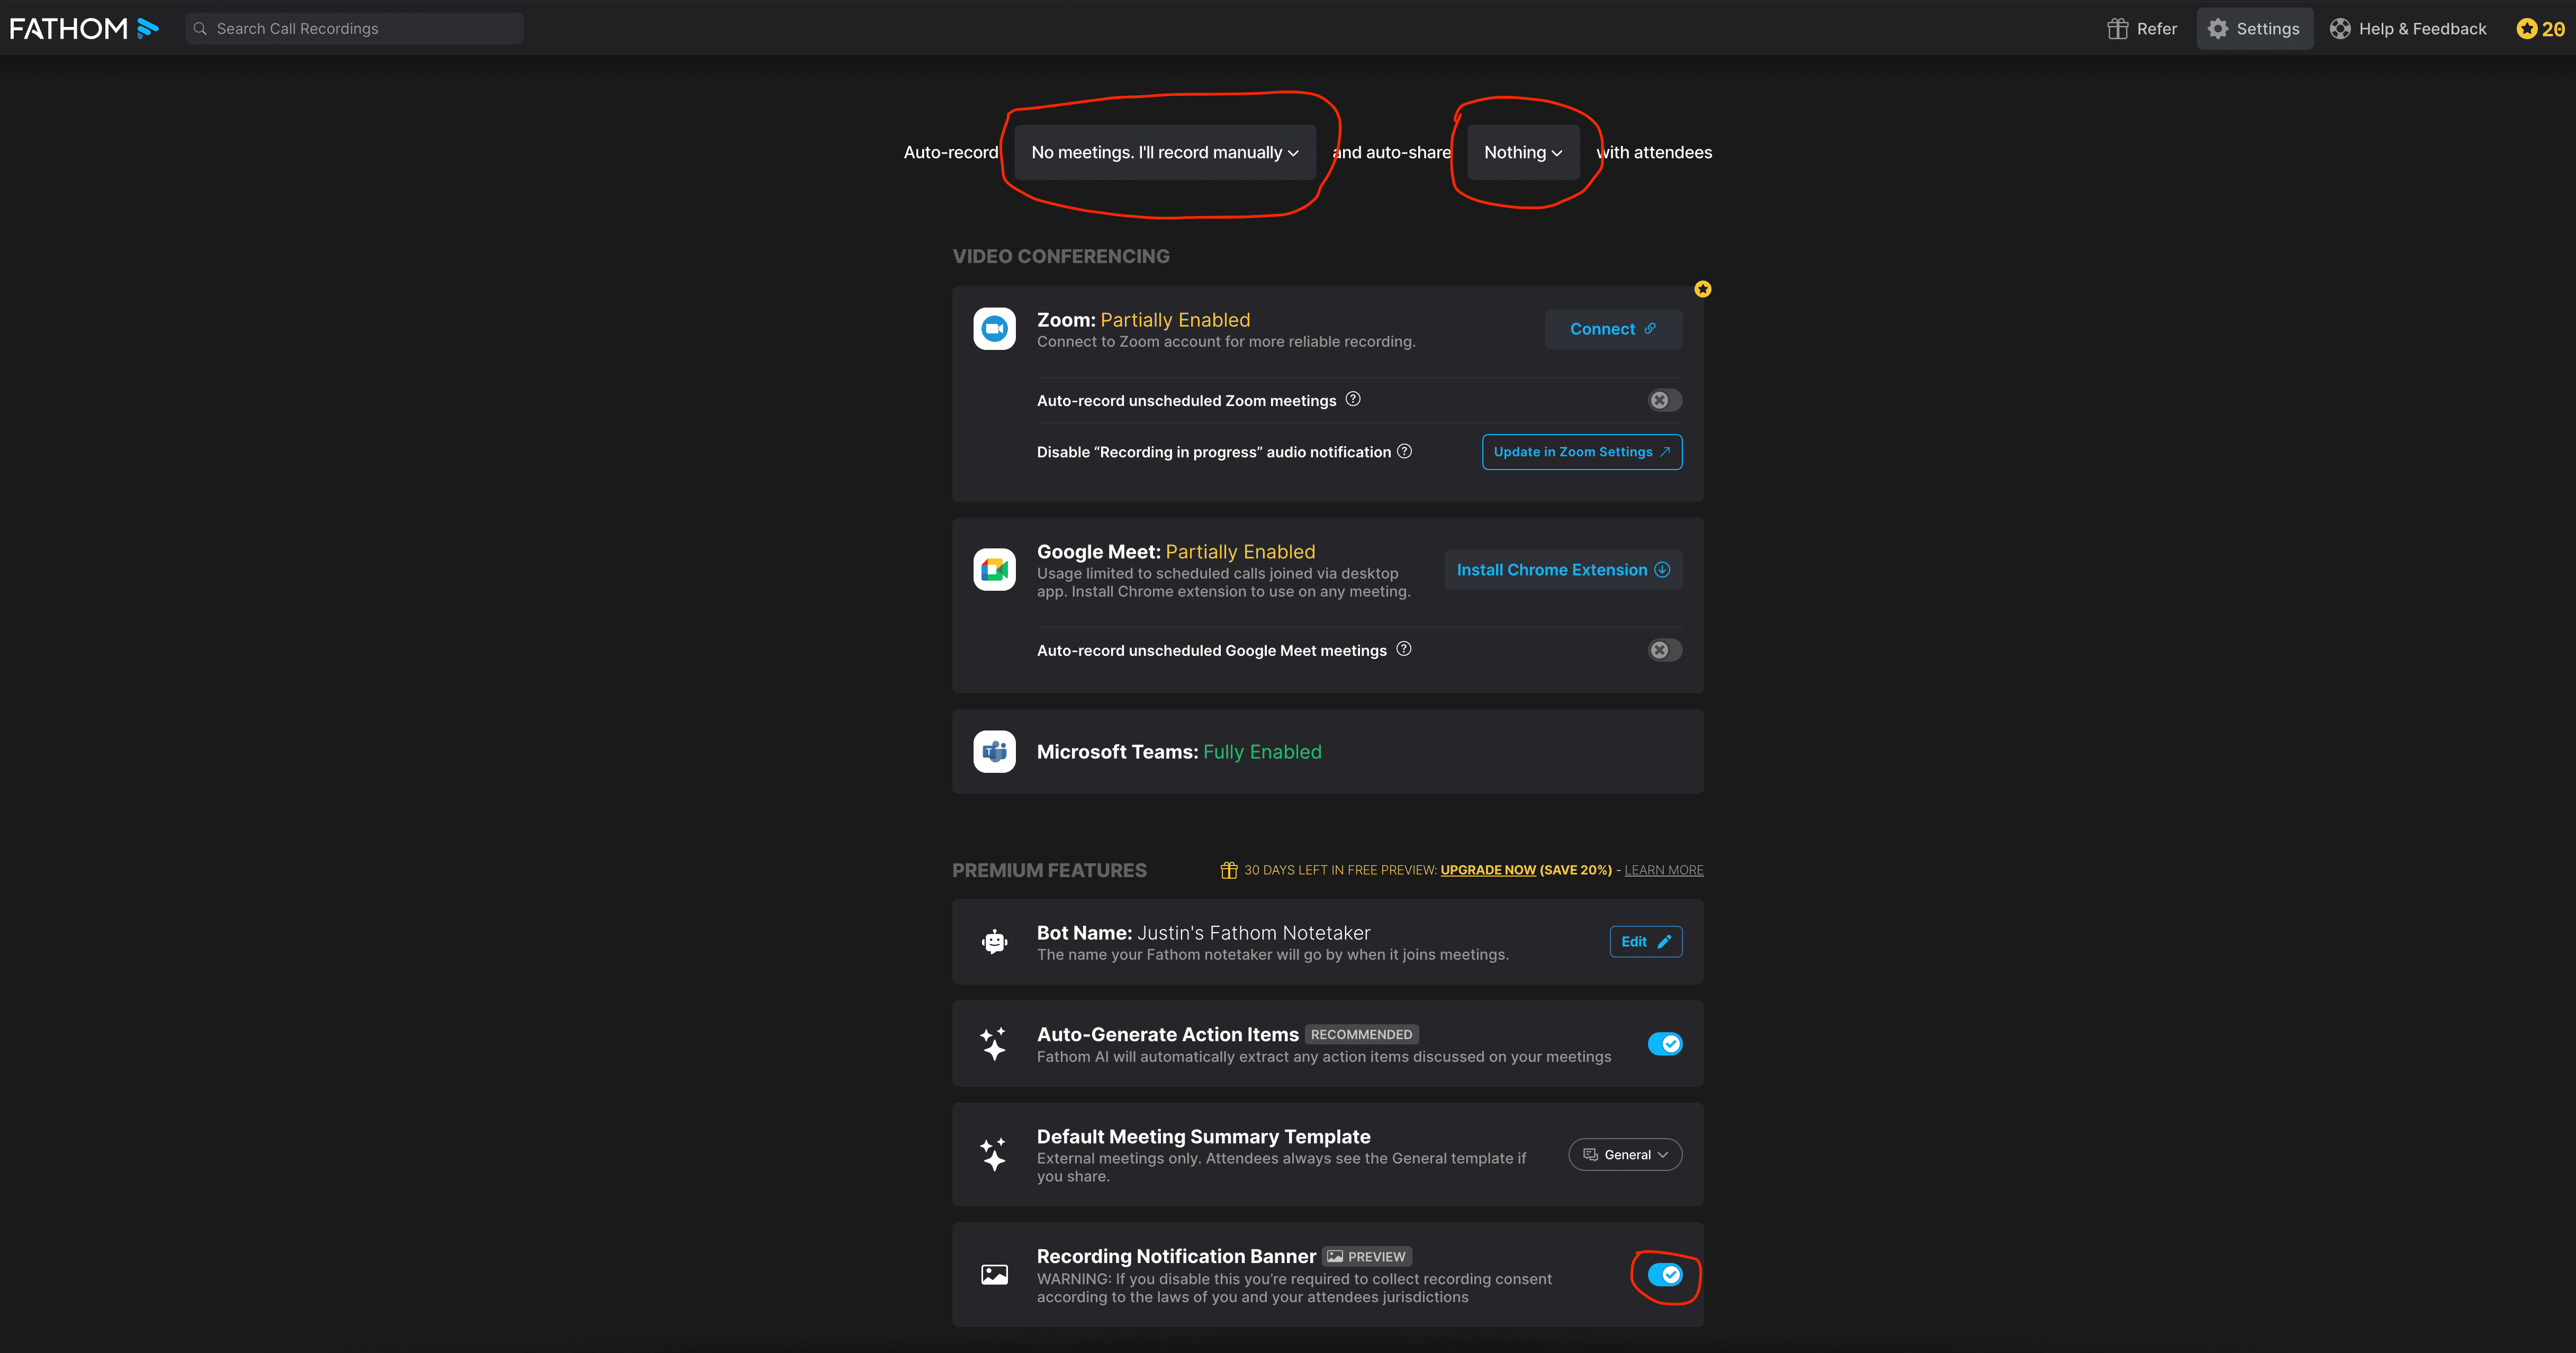
Go to Settings (gear icon in upper right) → Options
Critical privacy settings to configure:
- 📝 Set "Auto-record" to "No meetings. I'll record manually" - Ensures you have full control over which sessions are recorded, nothing happens automatically
- ❌ Set "Auto-share" to "Nothing" - Prevents automatic sharing of recordings
- 🔔 Turn ON "Recording Notification Banner" - Displays a banner during recording to notify all participants
- ✅ Enable "Auto Request Recording Consent" (RECOMMENDED) - Fathom will automatically email external meeting attendees 24 hours before meetings to get consent. If they decline, recording is disabled.
- 🔒 Set "Default Share Link Access" to "Only people added can view" - Ensures recordings are private by default, not accessible via link
- ❌ Disable "In-meeting Chat Interface" - Prevents Fathom from displaying prompts during your call that could distract from coaching
- ❌ Disable "Use my anonymized data to improve Fathom's AI for everyone" - Opts out of AI training entirely
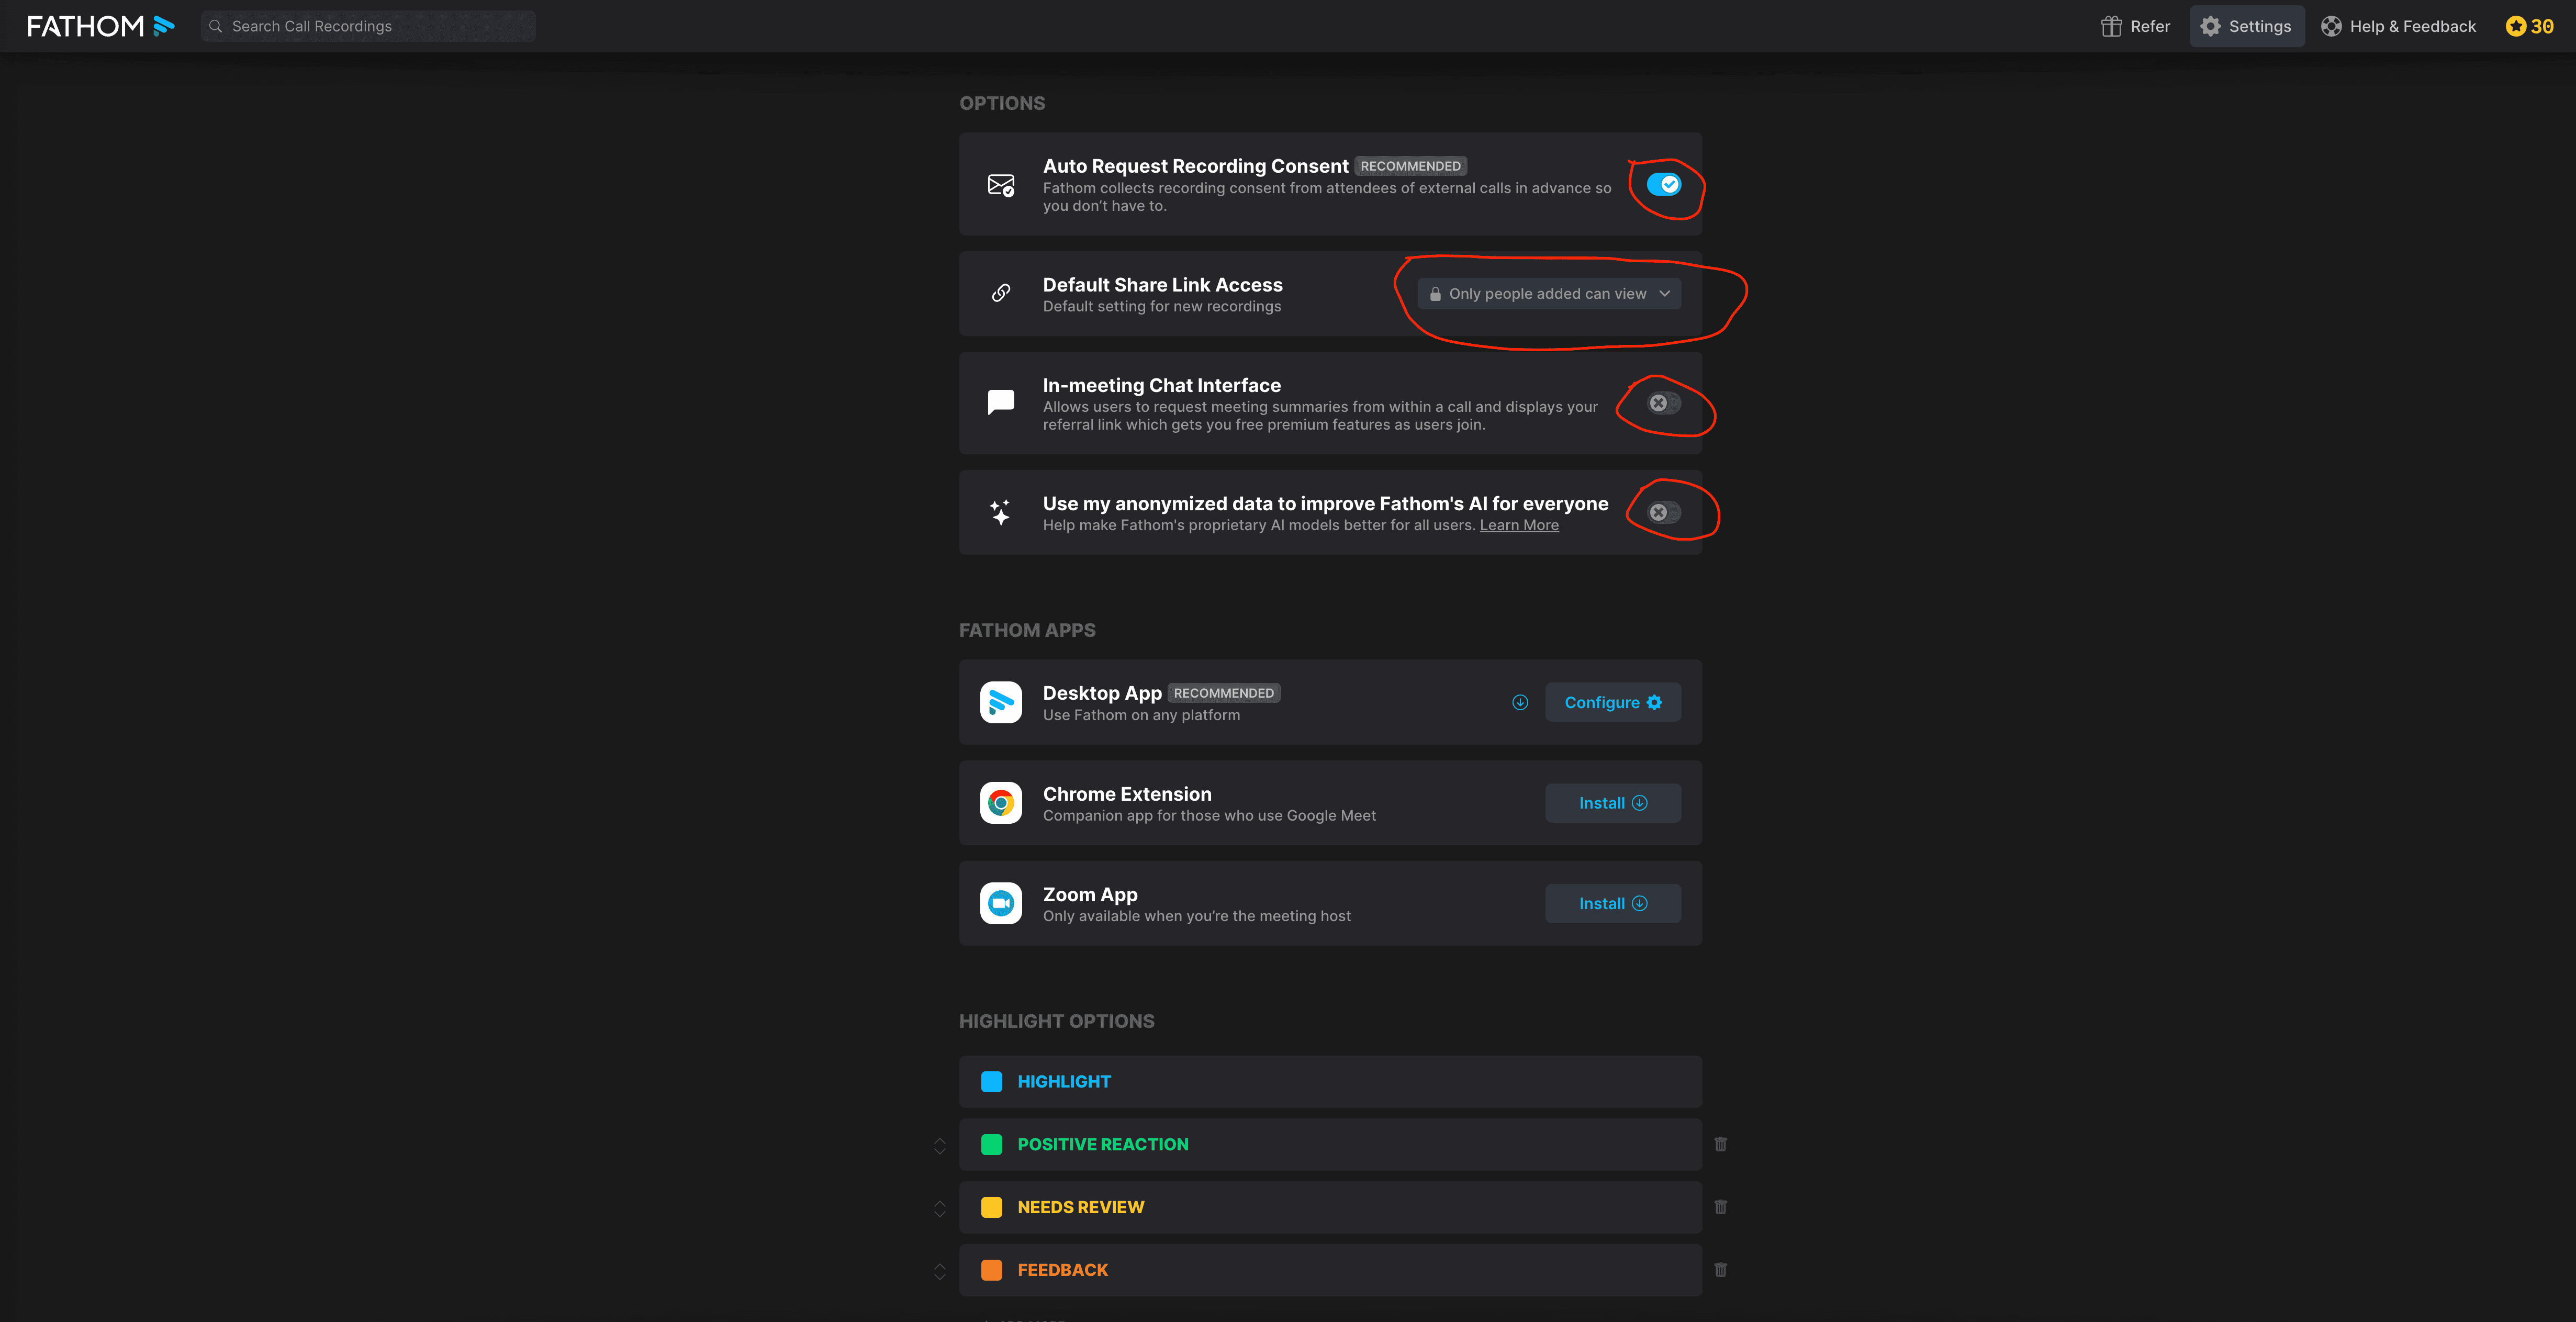
Result: Fathom will automatically request consent, keep recordings private, avoid chat distractions, and won't use your data for AI training.
During your coaching call:
- Join your Zoom, Google Meet, or Microsoft Teams meeting
- Fathom will automatically join and start recording (if consent was obtained)
- Conduct your coaching session normally
- Fathom records audio and generates a transcript in real-time
Consent notification: If you enabled "Auto Request Recording Consent," attendees will receive an email before the meeting. If they decline, Fathom will not record that specific session.
After the meeting ends, Fathom will process the recording (usually takes a few minutes).
- Go to your Fathom dashboard at fathom.video/home
- Find your coaching session in the list of recordings
- Click on the recording to open it
- Click on "Transcript"
- Click "Copy Transcript"
- Paste the transcript into a new Word or text document
- Save as one of our supported file formats (.txt, .docx, or .rtf)
Privacy tip: Store the transcript on your local, encrypted drive—not in a shared folder or cloud storage that others can access.
This is the most important step for privacy!
After copying your transcript, immediately delete the recording from Fathom's servers:
- While viewing the recording page (after clicking on the recording), click the three dots menu (⋯) in the upper right
- Select "Delete Call"
- Confirm the deletion
Why delete? Even with strong privacy settings, the safest approach is to minimize how long sensitive coaching conversations remain on third-party servers. Once you have your transcript, there's no reason to keep it in Fathom.
Upload the transcript file you saved to Coachismo for analysis.
Supported formats: .txt, .docx, .rtf
Granola
Granola is a desktop app that transcribes meetings and generates AI notes. Configure privacy settings before recording any coaching sessions.
Before recording coaching sessions, configure these privacy settings:
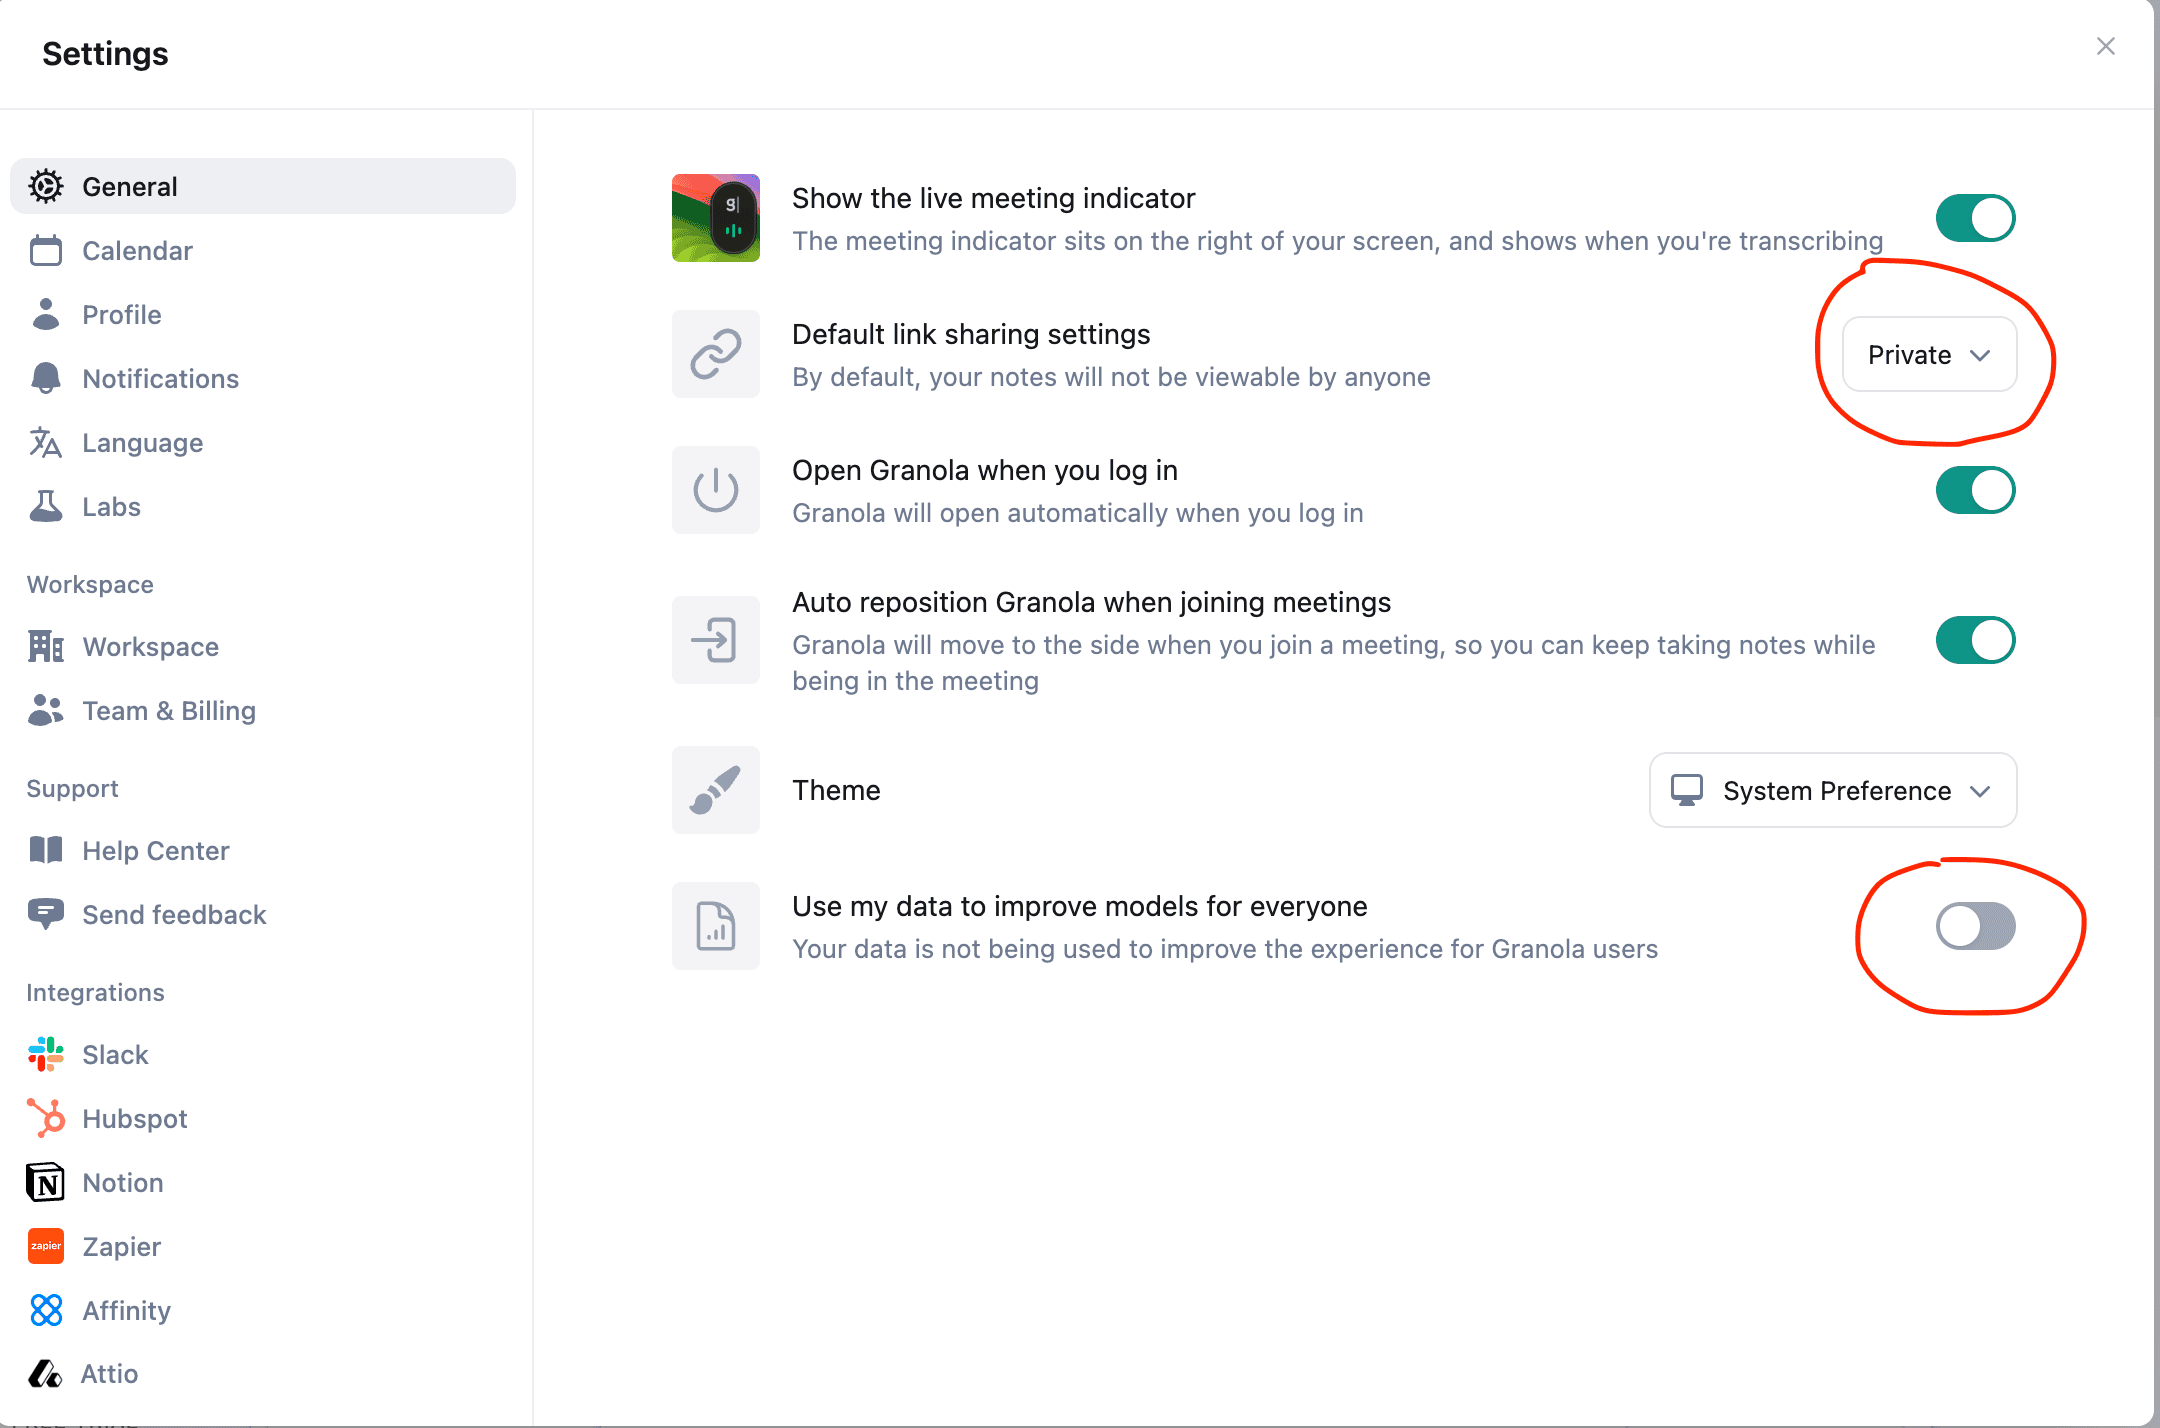
Settings → General:
- Set "Default link sharing settings" to Private
- Disable "Use my data to improve models for everyone"
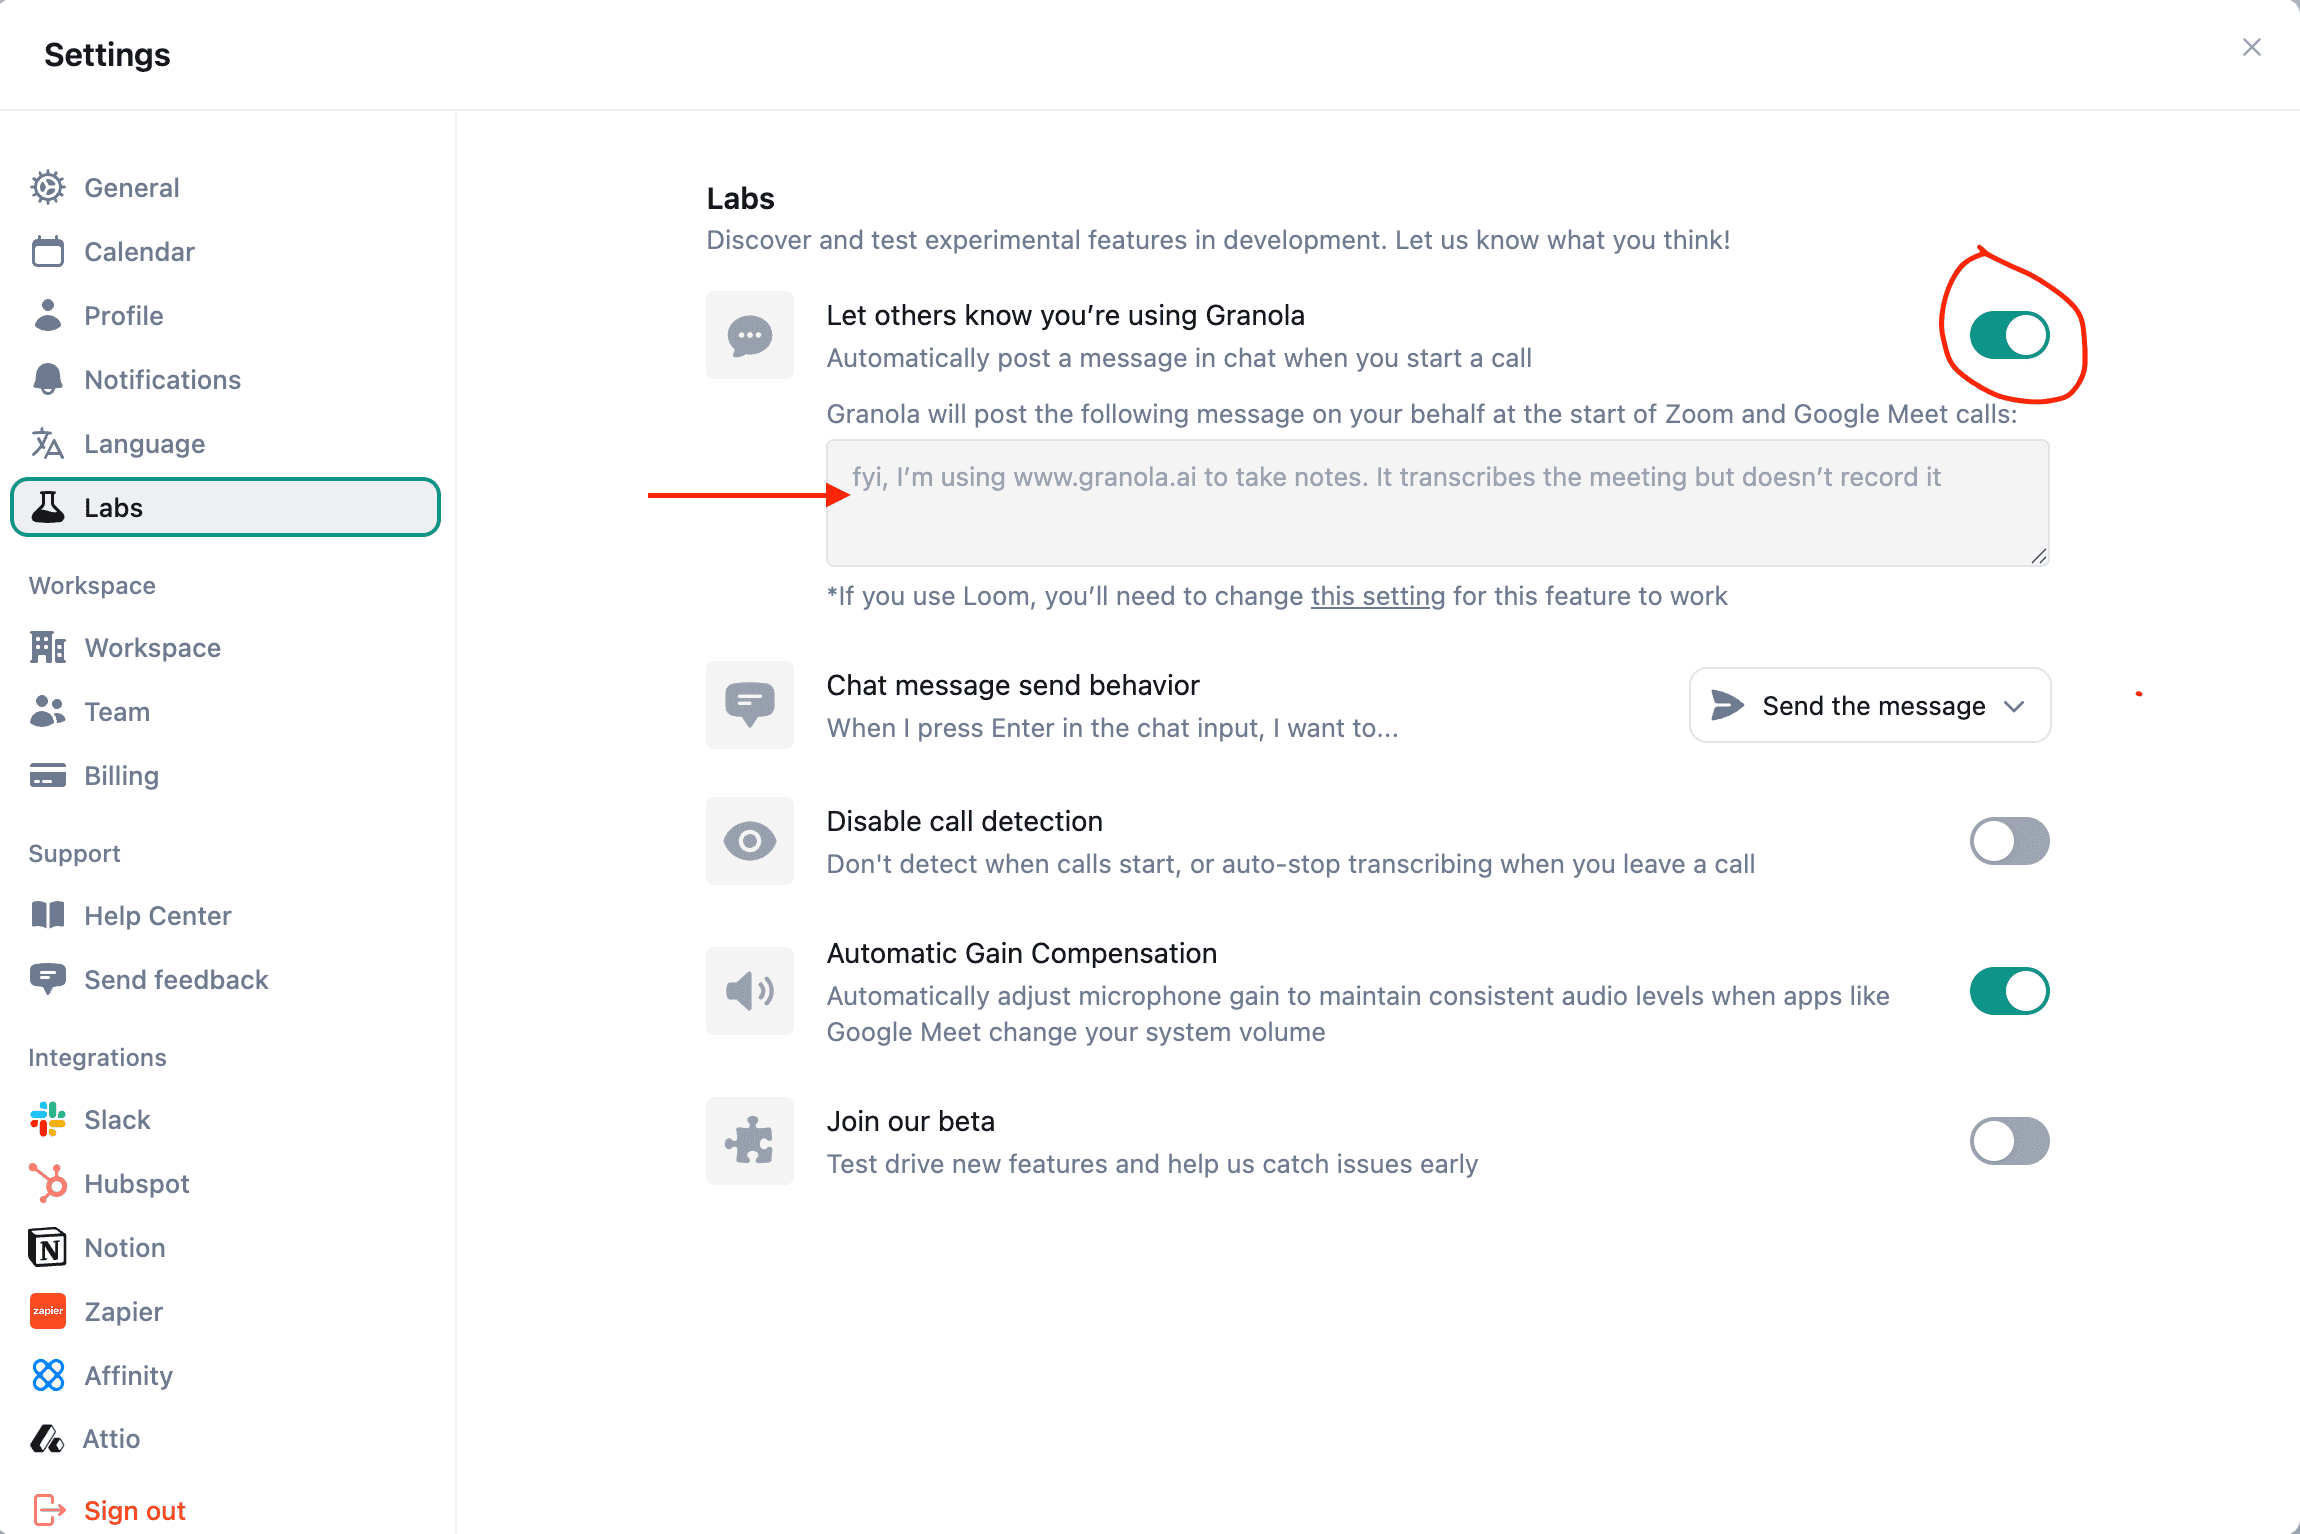
Settings → Labs:
- Enable "Let others know you're using Granola" to automatically post a notice in chat when you start transcribing
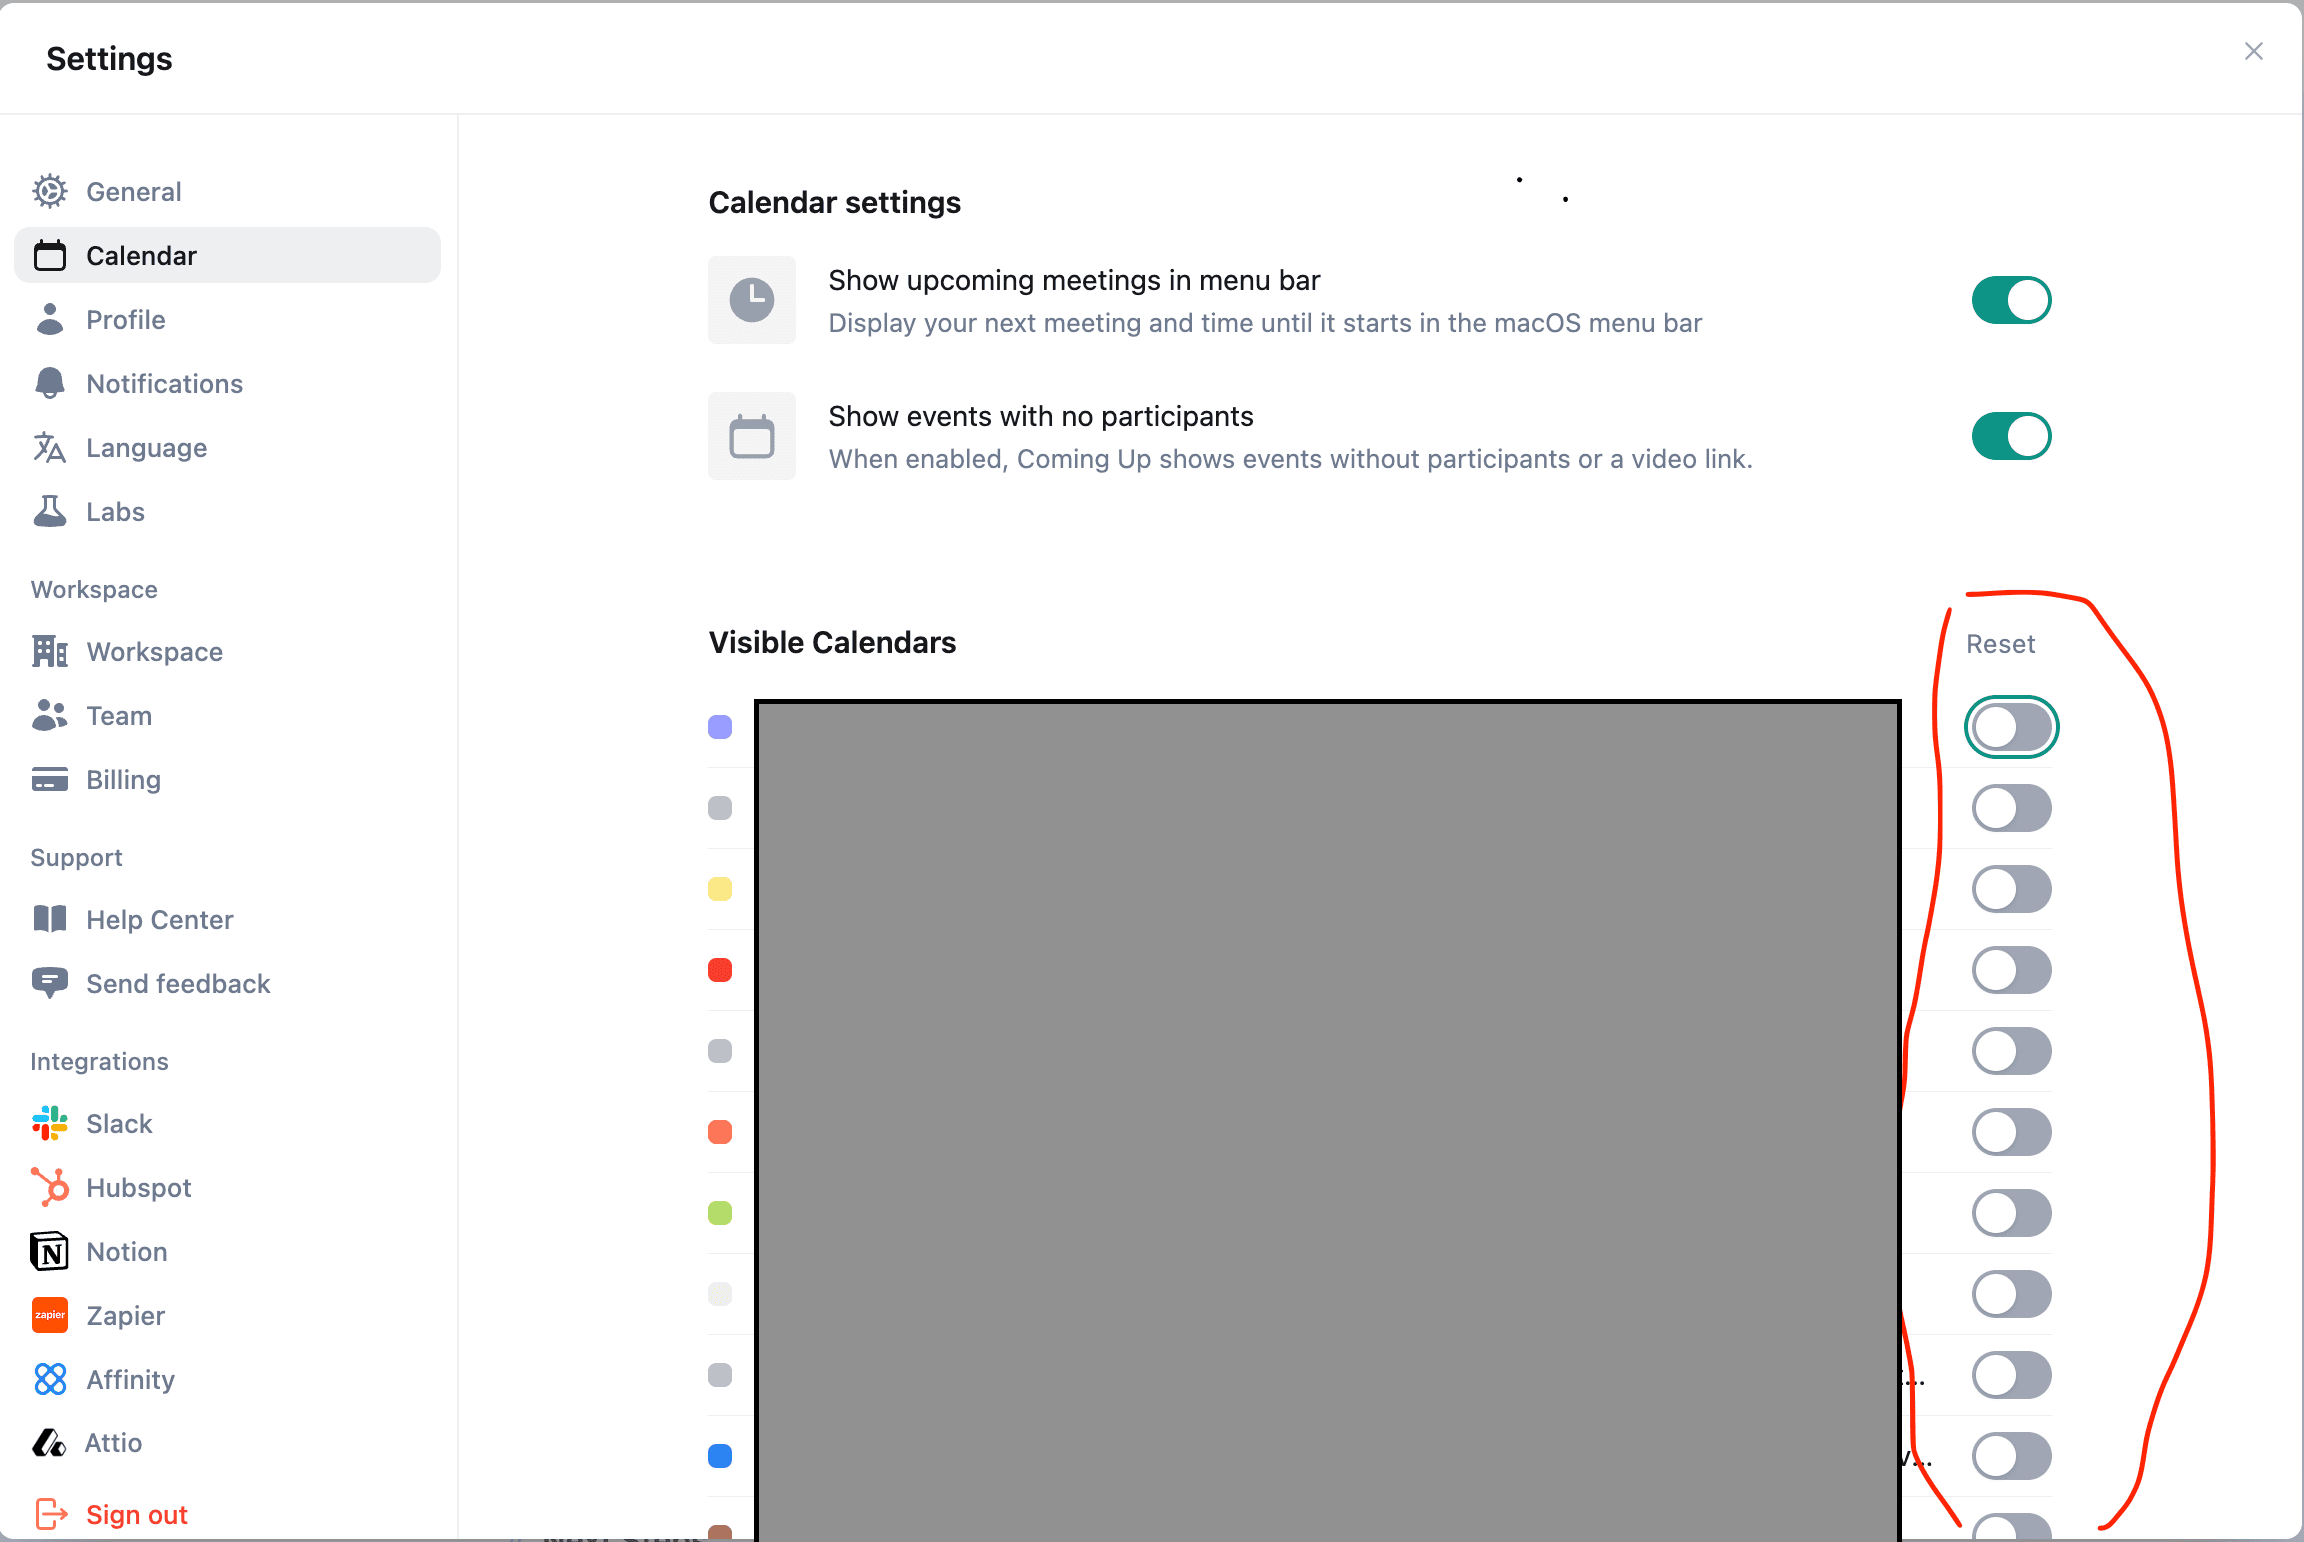
Settings → Calendars:
- Turn off all visible calendars (Calendar integration automatically captures the full names of all call participants, which violates client privacy)
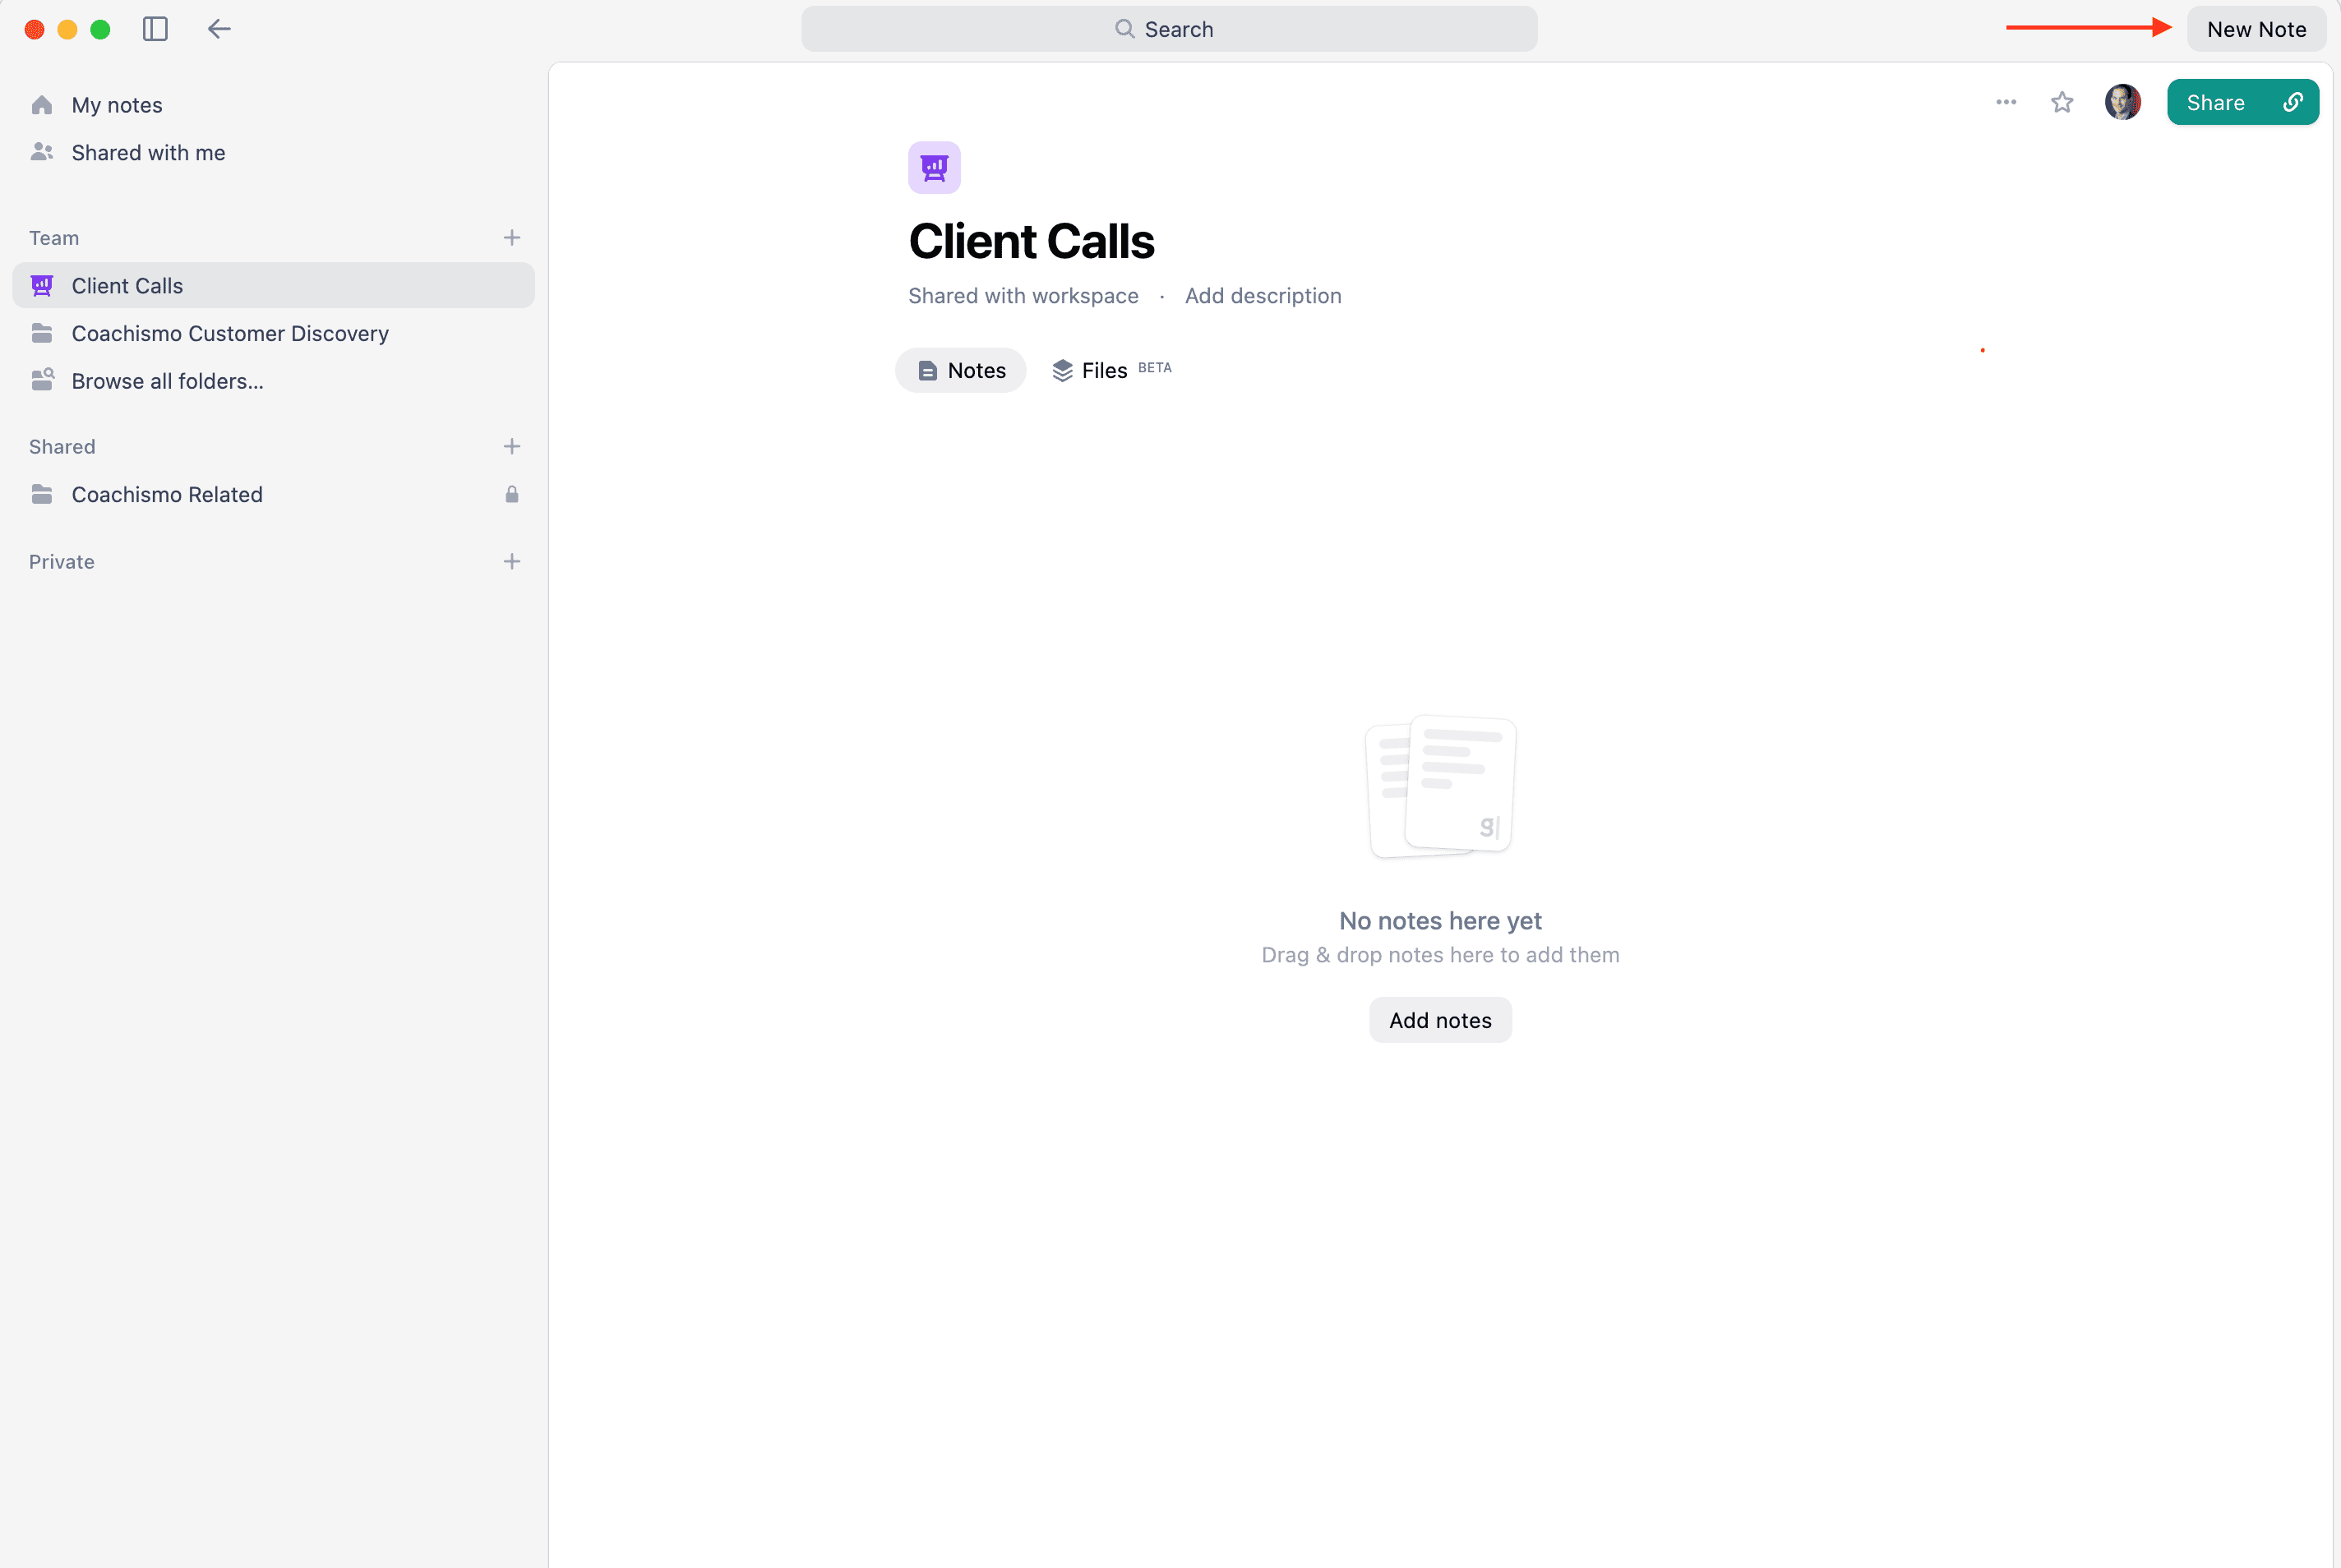
- Open Granola
- Select "New Note" to start a recording before you start your call
- Start your coaching session - Granola automatically transcribes as you speak
If you enabled the Labs setting, a message will automatically post in the chat notifying participants that transcription is active.
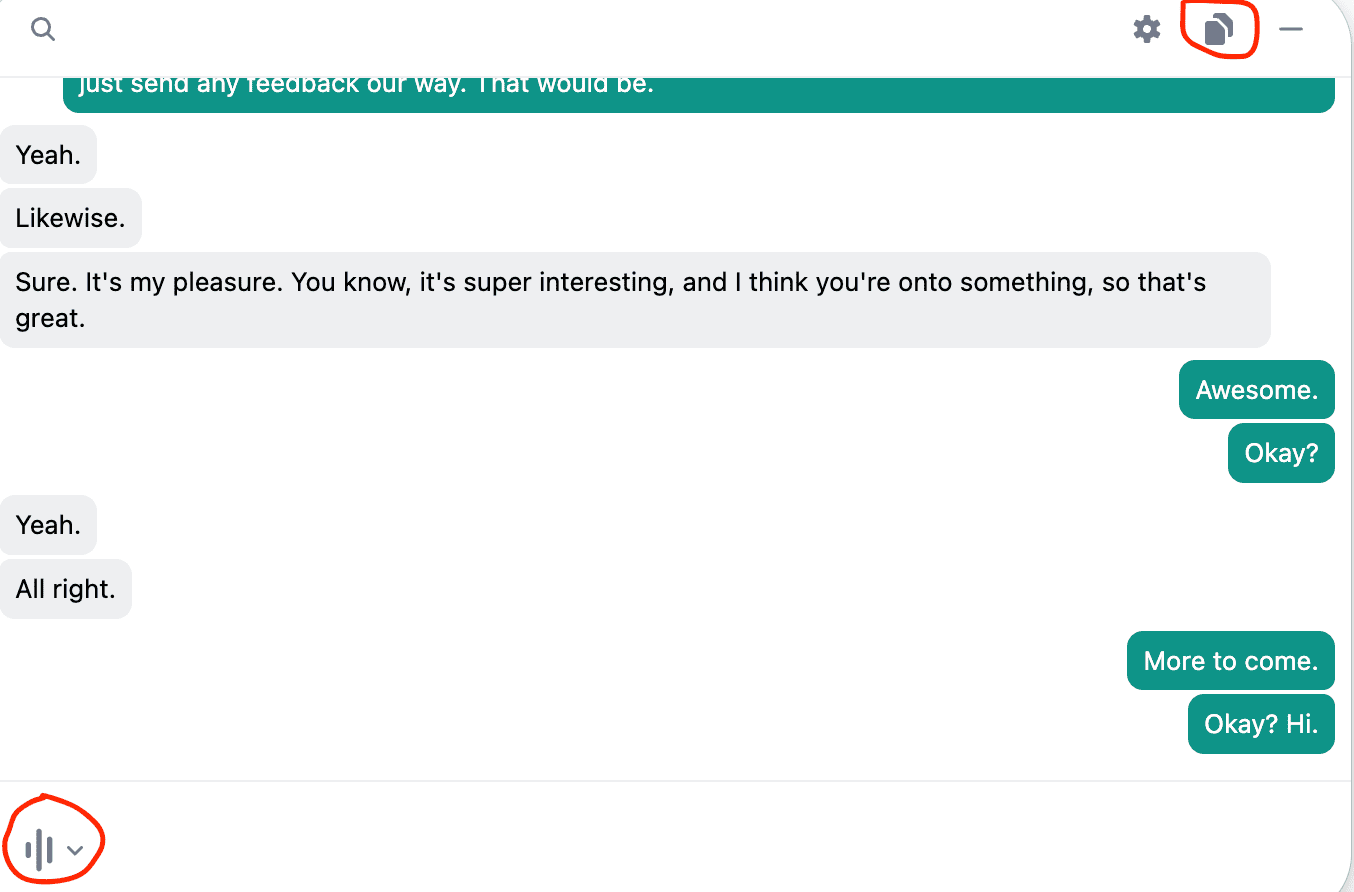
- After your session, click on the meeting in your Granola dashboard
- Click on the circle button on the lower left next to the chat box to display the transcript
- Hit the copy button on the upper right of that pop-up window
- Paste the transcript from your clipboard into a new Word, Google Doc, or text document
- Save as one of our supported file formats (.txt, .docx, or .rtf)
Upload the transcript file you saved to Coachismo for analysis.
Supported formats: .txt, .docx, .rtf
Otter.ai
Coachismo does not currently recommend Otter.ai.
A putative class-action lawsuit filed Aug 15, 2025 in the U.S. District Court for the Northern District of California alleges that Otter.ai “deceptively and surreptitiously” records private work conversations and uses them to train its AI without obtaining consent from all participants, potentially violating federal and California wiretap laws. See coverage by NPR: Class‑action suit claims Otter AI secretly records private work conversations.
If you must use Otter.ai, follow the privacy‑first setup below and minimize retention by exporting your transcript and deleting the cloud copy promptly.
Sign in to otter.ai (web) and configure these settings before recording any coaching session:
Settings → General:
- ✅ Do Not Sell or Share My Personal Information — turn this ON (opt‑out).
Settings → Meetings (a.k.a. Notetaker/Sharing defaults):
- ✅ Default audience for shared notes: Don’t share – keep my notes private.
- ✅ Default permission level: Viewer (not Collaborator).
- ❌ Allow collaborators to share: OFF.
- ❌ Auto‑share notes for calendar events: OFF.
- ⚙️ Otter Notetaker auto‑join: set to Only join meetings I manually select (avoid auto‑joining all meetings).
Data use / AI features:
- ❌ Disable/opt‑out of features like Otter Chat/Topics if available to reduce secondary processing.
Consent notice: At the start of each call, inform participants that transcription is active and obtain all‑party consent where required.
Revisit Settings → Meetings before sensitive calls:
- Confirm Don’t share – keep my notes private is selected.
- Confirm Allow collaborators to share is OFF.
- Keep Otter Notetaker auto‑join on manual.
If you manage a workspace, set a short data‑retention policy:
- Workspace → Manage Workspace → Settings → Data Retention: Set the minimum permissible retention window (e.g., 24 hours) for conversations and audio.
This helps ensure transcripts/audio are auto‑purged on a schedule.
Record live in Otter.ai (with manual Notetaker join) or upload an audio file for transcription. Avoid auto‑joining all meetings.
Go to My Conversations and open the session you just recorded or imported.
- Click the three‑dot menu (⋯) → Export.
- Select Text (.txt) or Word (.docx).
- Store locally on an encrypted drive, then upload to Coachismo for analysis.
After exporting, promptly remove cloud copies:
- In the conversation view, click (⋯) → Delete.
- Open Trash and choose Permanently Delete to bypass Otter's default trash retention.
Important: Permanent deletion ensures transcripts/audio are not retained in Otter’s systems.
Coachismo accepts: .txt, .docx, .rtf
Other Tools
Before using any AI transcription tool, take these privacy-first steps:
- Set sharing/visibility to Private by default.
- Disable any "Improve our models" or "Share data for research" options.
- Opt out of auto-join bots and auto-share features.
- Turn off bundled AI assistants/summaries unless required.
- Prefer local storage; if cloud is required, set a short retention window.
Key docs:
- Tool’s Privacy Policy (confirm data-use & training opt-outs)
- Tool’s Security/Compliance page (encryption, hosting region)
- Tool’s Data Retention & Deletion policy
Most tools support exporting transcripts. Look for:
- An Export or Download button in the transcript view
- Menu options like Export transcript / Save as text
- Context menu (⋯) with Export choices
- Go to the Coachismo upload screen.
- Select your exported transcript file and upload.
Tip: Keep client identifiers anonymized before upload when possible.
After confirming your upload, remove cloud copies in the third‑party tool:
- Open the conversation/meeting in the tool and click Delete.
- Empty the tool’s Trash/Recycle Bin to permanently remove it.
Important: Permanent deletion ensures transcripts aren’t retained unnecessarily in third‑party systems.
Coachismo accepts the following text formats:
- .txt - Plain text (most common)
- .docx - Microsoft Word document
- .rtf - Rich Text Format
If your tool doesn't support export, you can copy and paste the transcript text into a new .txt file on your computer, then upload it to Coachismo.
If you're using a transcription tool that's not listed here, please contact us at support@coachismo.com and we'll be happy to add instructions for it!
Ethical AI Use Compliance: Privacy Settings Required
AI transcription tools can be used ethically for coaching sessions if configured for maximum privacy so no personally identifiable information (PII) is retained or reused by the AI provider. Each tool below includes a "Privacy Settings" step that must be completed before recording client sessions. Disable data retention, AI training, and any cloud-based analysis features.
See our AI Usage Guidelines for complete information on acceptable AI use in coaching.